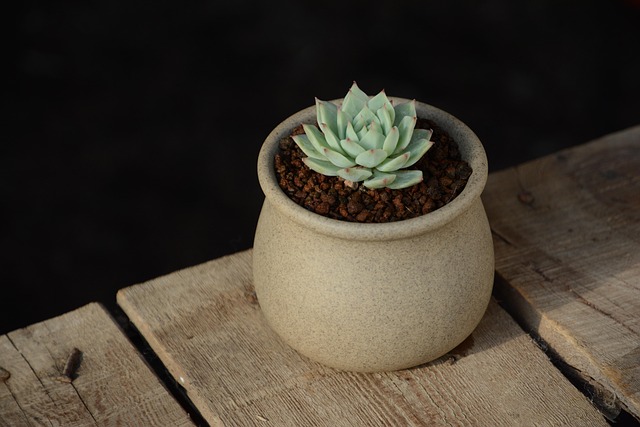
echeveria
Echeveria spp.
Evidence-based care guide for Echeveria (Echeveria spp.). Covers disease treatment, pest control, propagation methods, watering and lighting. Our analysis draws from 19 verified community cases with an average confidence score of 87%. Each protocol is synthesized from real rescue outcomes, not generic advice.
Care Essentials
Get to Know Your Echeveria
Light is everything for this plant. Get the placement right and everything else falls into place.
Light
bright indirect
Wants bright, indirect light — sensitive to both extremes. Too much direct sun causes burns, too little causes stretching.
💡 Grow lights: Thrives under artificial grow lights (LED or fluorescent, 10-12 hours/day). A great option if your space lacks natural light.
Watering
every 10-14 days
Let the soil dry out significantly between waterings — this plant is very sensitive to overwatering. When in doubt, wait another day.
Humidity & Temperature
Appreciates some humidity but adapts to average home conditions. Brown tips in winter? Your air might be too dry — a light misting helps.
Standard room temperature (60-80°F / 15-27°C) is perfect. Avoid cold drafts and sudden temperature swings.
Soil
Needs well-draining soil — add perlite or orchid bark to a standard potting mix. Good drainage is critical to prevent root rot.
Care Requirements
At a Glance
Care Profile in Development
While our detailed care profile is being compiled, you can find specific care guidance in the 4 care-related diagnoses below — including watering schedules, light requirements, and propagation methods from real-world cases.
Start Here
Most Common Problems
Based on 19 analyzed cases — these are the issues you're most likely to encounter
Don't see your symptom? Search all 15 topics below, or run the Diagnostic.
How do I propagate my Echeveria?
When Echeveria become etiolated (stretched from low light), the elongated stems...
Why is my Echeveria becoming etiolated?
Echeveria require higher light levels than many other succulents. In low light,...
Why does my Echeveria have sunburn?
Succulents grown in low-light indoor conditions develop thin, etiolated leaves...
Echeveria: Dropping Leaves
Echeveria naturally reabsorb their oldest (bottom) leaves to fuel new growth at...
Why does my Echeveria have root rot?
Echeveria succulents store water in fleshy leaves and rosettes, making them...
Which of the 7 Killers
is threatening your plants?
We analyzed 1,616 documented plant deaths to identify the 7 causes behind 78% of all losses. Answer 5 questions — we'll tell you exactly which ones apply to your setup.
Skip the quiz — get The 7 Killers course ($19) →Question 1 of 5
How do you decide when to water your plants?
Question 2 of 5
Where do most of your plants live?
Question 3 of 5
What's your home environment like?
Question 4 of 5
Have you lost a plant in the last 6 months?
Question 5 of 5
How often do you check your plants for pests?
Your diagnosis is ready
We've identified your top 2 risk killers. Enter your email to see the full breakdown and your personalized rescue protocol.
Your plants are most at risk from:

The 7 Killers mini-course covers every one of these in depth — mechanism, rescue protocol, prevention. 1,616 cases. 7 lessons. $19.
Get The 7 Killers — $19 →Get the Plant Mortality Checklist
The 7 killers behind 78% of houseplant deaths — and the exact fix for each. Free PDF based on 1,616 documented cases.
Your checklist is ready!
We also sent it to your inbox. Check your email for the full download.
Open the ChecklistFree. No spam. Unsubscribe anytime.
Verified Data
All Diagnoses
15 topics consolidated from 19 documented cases. Expand any topic to see all protocols.
Diseases (2 topics · 2 cases)
Echeveria: Mold
Succulents in high-humidity environments or with poor airflow are prone to fungal surface mold on soil
83%
Echeveria: Mold
Succulents in high-humidity environments or with poor airflow are prone to fungal surface mold on soil
Cause
Succulents in high-humidity environments or with poor airflow are prone to fungal surface mold on soil. This occurs when organic soil components remain moist for extended periods, promoting decomposition and fungal growth. While rarely fatal to the plant, it indicates suboptimal conditions that can lead to root issues.
Solutions
- 1. Gently scrape off surface mold with a sterile spoon to remove visible spores
- 2. Increase airflow immediately with a small fan or by moving to a breezier location
- 3. Allow soil to dry completely - withhold water until top 2-3 inches are bone dry
- 4. If mold returns, repot in fresh sterile mix with higher inorganic content (60-70% grit)
- 5. Apply diluted neem oil or cinnamon powder to soil surface as preventive antifungal treatment
Prevention
Use gritty, inorganic-heavy soil mixes (50-70% perlite/pumice); maintain humidity below 50% for most succulents; ensure strong airflow with fans or open windows; water at soil level avoiding wetting leaves; allow soil to dry completely between waterings; apply cinnamon powder to soil surface as natural antifungal
Why does my Echeveria have root rot?
Echeveria succulents store water in fleshy leaves and rosettes, making them highly susceptible to root rot when soil remains moist for extended periods
91%
Why does my Echeveria have root rot?
Echeveria succulents store water in fleshy leaves and rosettes, making them highly susceptible to root rot when soil remains moist for extended periods
Cause
Echeveria succulents store water in fleshy leaves and rosettes, making them highly susceptible to root rot when soil remains moist for extended periods. Anaerobic conditions develop when the soil water content exceeds field capacity for 7+ days, promoting bacterial and fungal pathogens (Pythium, Fusarium) that colonize the shallow, fine root system. The rosette growth habit traps moisture at the stem base, accelerating crown rot that can kill the plant within 2-4 weeks of symptom onset.
Solutions
- Inspect immediately: Remove plant from pot and examine roots—healthy roots are white and firm, rotted roots are black/brown and mushy
- Surgical removal: Trim ALL rotted roots and any affected stem tissue with sterilized scissors until only healthy white tissue remains
- Sterilize: Treat cut surfaces with cinnamon powder or 3% hydrogen peroxide (1:1 with water) for 20 minutes to kill remaining pathogens
- Callus period: Lay plant on dry paper towel in bright indirect light for 48-72 hours until wounds seal
- Repot in dry mix: Use fresh gritty succulent soil (50% perlite/pumice, 50% cactus mix) in a pot with drainage holes—do NOT water for 1 week
Prevention
Implement 'soak and dry' watering: Water only when top 2-3 inches of soil are bone-dry (typically every 2-3 weeks indoors). Use terracotta pots with drainage holes to wick excess moisture. Maintain 40-50% humidity and bright indirect light to accelerate soil drying. Never let Echeveria sit in saucers of standing water.
Pests (1 topics · 1 cases)
Why does my Echeveria have mealybugs?
Mealybugs are the most common pest affecting echeverias, targeting the tight rosette centers where leaves overlap and provide shelter
82%
Why does my Echeveria have mealybugs?
Mealybugs are the most common pest affecting echeverias, targeting the tight rosette centers where leaves overlap and provide shelter
Cause
Mealybugs are the most common pest affecting echeverias, targeting the tight rosette centers where leaves overlap and provide shelter. These sap-sucking insects excrete honeydew that promotes sooty mold growth. The waxy coating on mealybugs makes them resistant to standard water sprays, requiring targeted intervention.
Solutions
- 1. Manual removal: Dip cotton swab in 70% isopropyl alcohol and dab each visible mealybug. Alcohol dissolves their waxy coating on contact.
- 2. Spray treatment: Mix 1 tablespoon mild liquid soap + 1 cup 70% rubbing alcohol + 1 quart water. Spray entire plant, especially leaf axils, every 3 days for 3 treatments.
- 3. Systemic for severe cases: Apply imidacloprid granules to soil per label instructions for ongoing protection lasting 6-8 weeks.
- 4. Inspect undersides: Check leaf undersides and base of plant weekly for 3 weeks after treatment to catch survivors.
- 5. Quarantine: Keep treated plant isolated until 2 weeks after last visible mealybug observed to prevent spread to other plants.
Prevention
Inspect new plants thoroughly before introducing to collection. Isolate new acquisitions for 2 weeks. Avoid over-fertilizing which produces soft growth attractive to pests.
Watering Issues (1 topics · 1 cases)
Is my Echeveria overwatered?
Echeveria store moisture in fleshy leaves to survive drought periods
85%
Is my Echeveria overwatered?
Echeveria store moisture in fleshy leaves to survive drought periods
Cause
Echeveria store moisture in fleshy leaves to survive drought periods. Their root systems require oxygen exchange between waterings. When watered too frequently (before soil dries 2-3 inches deep), roots suffocate in waterlogged conditions, triggering root rot and leaf drop.
Solutions
- Check soil moisture with finger test before watering—bits of soil clinging to finger means hold off
- Water thoroughly until water exits drainage holes, then allow complete drying
- Reduce watering frequency to every 2-4 weeks in growing season, less in winter dormancy
- Err on the side of caution—Echeveria tolerate drought far better than overwatering
- Remove excess water from saucers immediately after watering
Prevention
Use the 'soak and dry' method: water thoroughly only when top 2-3 inches of soil are completely dry. Push finger into soil to first knuckle—if dry, water; if moist, wait. Never let pots sit in saucers of standing water.
Environment (1 topics · 1 cases)
Why does my Echeveria have sunburn?
Succulents grown in low-light indoor conditions develop thin, etiolated leaves with reduced cuticular wax and insufficient photoprotective pigments (anthocyanins, carotenoids)
92%
Why does my Echeveria have sunburn?
Succulents grown in low-light indoor conditions develop thin, etiolated leaves with reduced cuticular wax and insufficient photoprotective pigments (anthocyanins, carotenoids)
Cause
Succulents grown in low-light indoor conditions develop thin, etiolated leaves with reduced cuticular wax and insufficient photoprotective pigments (anthocyanins, carotenoids). When abruptly exposed to direct sunlight or intense grow lights, the leaf epidermal cells undergo photoxidative damage—cellular rupture from reactive oxygen species (H2O2) buildup due to rapid photosystem imbalance. The tissue cannot dissipate excess energy, causing chlorophyll degradation and cell death that appears as bleached, brown, or crispy patches typically on the most exposed leaf surfaces.
Solutions
- Immediately move affected plant to bright indirect light only—stop all direct sun exposure
- Do not remove burnt leaves unless completely dried and crispy; damaged tissue still photosynthesizes
- Maintain normal watering schedule (do not overwater to 'compensate' for damage)
- Allow 4-8 weeks for new growth to emerge from center; new leaves will form with proper pigments
- Resume gradual acclimation only after full recovery and new growth appears
Prevention
Acclimate all light transitions gradually over 7-14 days: begin with 1-2 hours of morning sun or filtered light, increasing exposure by 30-60 minutes daily. Use sheer curtains or 50-70% shade cloth initially. Maintain plants in bright indirect light (not deep shade) before any transition to build baseline resilience.
Growth & Structure (1 topics · 2 cases)
Why is my Echeveria becoming etiolated?
Echeveria require higher light levels than many other succulents
2 protocols
90–94%
Why is my Echeveria becoming etiolated?
Echeveria require higher light levels than many other succulents
Protocol 1: etiolation · 94% confidence
Cause
Echeveria require higher light levels than many other succulents. In low light, they stretch their stems rapidly, losing the compact rosette shape.
Solutions
- Behead the plant: Cut the healthy compact top off, leaving 1-2 inches of stem.
- Let the cutting callous for 3 days, then plant in dry soil.
- Leave the original stump; it will often produce "pups" (babies) along the stem.
Prevention
Provide 6-8 hours of direct morning sun or strong grow lights. Monitor leaf angle: if leaves turn downward, it needs more light.
Protocol 2: etiolation · 90% confidence
Cause
Etiolation in Echeveria occurs when plants receive insufficient photosynthetically active radiation (PAR < 200 μmol/m²/s or < 1000 lux). This triggers photomorphogenic responses where auxin hormones drive stem elongation (internode stretching) as the plant phototropically seeks light sources. The Crassulacean Acid Metabolism (CAM) photosynthesis of Echeveria requires high light intensity to maintain compact rosette growth; low light causes etiolated stems with spaced, delicate leaves and pale green coloration due to chlorophyll dilution.
Solutions
- 1. Relocate immediately to brighter position: South-facing window with 4-6 hours direct sun or quality LED grow light positioned <2 inches from plant
- 2. Increase light gradually over 7-14 days to avoid sunburn shock—monitor for bleaching or brown spots
- 3. Prune etiolated stems if desired: Cut below rosette, allow cut to callus 2-3 days, then replant for compact regrowth
- 4. Supplement with full-spectrum LED (not cheap blurple USB lights) on 12-14 hour photoperiod if natural light insufficient
Prevention
Maintain 6+ hours of bright direct sunlight or 12-16 hours under full-spectrum LED grow lights (target 10,000+ lux or 200-400 μmol/m²/s). Position plants within 1-2 feet of south/west-facing windows. Rotate plants weekly for even exposure. Use phone lux meter apps to verify light levels quarterly.
Propagation (1 topics · 4 cases)
How do I propagate my Echeveria?
When Echeveria become etiolated (stretched from low light), the elongated stems weaken and cannot support the rosette properly, leading to instability, leaf yellowing, and poor aesthetics
4 protocols
83–88%
How do I propagate my Echeveria?
When Echeveria become etiolated (stretched from low light), the elongated stems weaken and cannot support the rosette properly, leading to instability, leaf yellowing, and poor aesthetics
Protocol 1: beheading propagation · 88% confidence
Cause
When Echeveria become etiolated (stretched from low light), the elongated stems weaken and cannot support the rosette properly, leading to instability, leaf yellowing, and poor aesthetics. The tissue remains viable but the structural integrity is compromised. Beheading (cutting the terminal rosette from the elongated stem) allows propagation of the healthy crown while the remaining stem can produce new offsets.
Solutions
- 1. Select sterilized cutting tool: Use clean razor blade or sharp scissors wiped with 70% isopropyl alcohol
- 2. Position cut: Cut stem 0.5-1 inch below the lowest healthy leaves of the rosette, ensuring the cutting includes the crown intact
- 3. Remove lower leaves (optional): Gently remove 2-3 bottom leaves from cutting to expose stem for rooting
- 4. Callus formation: Lay cutting on dry paper towel in shaded, dry area for 48-72 hours until cut end forms dry, sealed scab
- 5. Rooting setup: Plant callused cutting 0.5-1 inch deep in well-draining succulent mix (70% perlite/pumice, 30% cactus soil)
- 6. Initiate rooting: Water sparingly after 1 week—light misting only until roots emerge (2-4 weeks)
- 7. Provide bright light: Position under grow lights or south window immediately to prevent re-etiolation
Prevention
Prevent etiolation through adequate lighting (6+ hours direct sun). Regularly monitor stem length—compact Echeveria should have <0.5 inch internode spacing. Address stretching early before stems become woody and difficult to cut.
Protocol 2: propagation myths · 85% confidence
Cause
Historical propagation advice emphasized letting Echeveria cuttings 'scab over' for extended periods (1-2 weeks), leading to desiccation and failed rooting. While callus formation prevents rot, excessive drying inhibits meristematic activity necessary for root primordia development. The myth conflates cactus propagation with leaf succulents that require quicker planting to maintain cellular hydration for root initiation.
Solutions
- Harvest propagation material: Select healthy, firm leaves; avoid damaged or stressed tissue
- Timing: Allow only 24-48 hours for callus formation on a dry paper towel in indirect light
- Medium selection: Use perlite, coarse sand, or very well-draining succulent mix—not standard potting soil
- Moisture balance: Lightly mist soil surface every 3-4 days; avoid waterlogging but don't allow complete desiccation
- Root emergence timeline: Most Echeveria develop roots in 2-4 weeks at 65-75°F; slower in cold or very dry conditions
Prevention
Callus formation requires only 24-48 hours for Echeveria leaf propagation, not the week+ often recommended. Maintain moderate humidity (40-60%) during callusing to prevent excessive desiccation. Use sharp, sterile tools to minimize wound size and accelerate healing. For stem cuttings, thicker cuts require longer callusing than thin leaf propagations.
Protocol 3: propagation · 85% confidence
Cause
Echeveria species readily propagate from leaves due to their thick, water-storing tissues and meristematic cells at the leaf base. The parent leaf provides nutrients to the developing plantlet until roots establish. This natural survival mechanism allows Echeveria to reproduce even if the main stem is damaged.
Solutions
- 1. Gently twist a healthy, plump leaf from the stem, ensuring a clean break at the base
- 2. Lay the leaf on dry succulent soil with the callus end (where it attached to stem) touching soil
- 3. Keep in bright indirect light and do not water until roots and baby plant (pup) emerge
- 4. Once the pup is 1-2 inches tall and roots are visible, water lightly every 7-10 days
- 5. The original leaf will shrivel and die naturally as it transfers energy to the new plant
Prevention
Propagate during spring or fall when temperatures are moderate (65-75°F); avoid propagating in extreme heat or cold; ensure leaves are healthy and fully hydrated before removal; use sterilized soil to prevent fungal issues; provide consistent humidity of 40-60% for optimal root development
Protocol 4: leaf propagation · 83% confidence
Cause
Echeveria leaf propagation success depends on cytokinin-driven cell dedifferentiation and adventitious organogenesis. When a healthy leaf is detached, wound-induced ethylene triggers callus formation at the cut site. Stored auxins and cytokinins in leaf tissue then stimulate root and shoot meristem development. Success rates correlate with leaf health (turgidity, absence of rot) and callus formation time (typically 7-14 days before root emergence).
Solutions
- 1. Gently detach healthy leaves from base of stem
- 2. Allow cut end to callus 1-2 days in indirect light (prevents rot)
- 3. Place on well-draining succulent soil or shallow dish
- 4. Mist soil only when completely dry (every 1-2 weeks)
- 5. Expect root emergence in 2-4 weeks, new growth in 4-8 weeks
Prevention
Select plump, healthy leaves without damage; allow 1-2 day callusing period in indirect light; maintain low humidity initially to prevent rot.
Other Topics (8 topics · 8 cases)
How much light does my Echeveria need?
While Echeveria evolved in high-light environments, abrupt transition from nursery/greenhouse conditions (typically 30-50% shade) to direct sun causes photobleaching and sunburn
89%
How much light does my Echeveria need?
While Echeveria evolved in high-light environments, abrupt transition from nursery/greenhouse conditions (typically 30-50% shade) to direct sun causes photobleaching and sunburn
Cause
While Echeveria evolved in high-light environments, abrupt transition from nursery/greenhouse conditions (typically 30-50% shade) to direct sun causes photobleaching and sunburn. The myth that 'succulents love direct sun' ignores acclimation requirements. UV intensity and duration matter—morning direct sun differs dramatically from afternoon exposure. Many Echeveria varieties actually prefer bright indirect light for optimal color development.
Solutions
- Assess current light conditions: If leaves show bleached patches or brown spots, reduce direct sun immediately
- Gradual acclimation: Move plants 1 foot closer to window every 5-7 days over 3 weeks
- Morning sun protocol: East-facing windows provide ideal gentle direct sun; south/west windows require screening
- Visual indicators of overexposure: Brown/crispy patches, sudden color bleaching, wilting despite adequate water
- Recovery: Move to bright indirect light for 2-4 weeks; damaged leaves won't recover but new growth will adapt
Prevention
Acclimate Echeveria gradually to increased light over 2-3 weeks. Provide morning direct sun (before 11am) initially, then extend exposure by 30 minutes every 3-4 days. Use sheer curtains or partial shade cloth during peak hours. Monitor for color change—red/purple stress colors indicate light stress, not necessarily healthy sun exposure.
Echeveria: Dropping Leaves
Echeveria naturally reabsorb their oldest (bottom) leaves to fuel new growth at the center
91%
Echeveria: Dropping Leaves
Echeveria naturally reabsorb their oldest (bottom) leaves to fuel new growth at the center
Cause
Echeveria naturally reabsorb their oldest (bottom) leaves to fuel new growth at the center. This is normal growth, not a health issue.
Solutions
- If leaves are crispy and dry, gently pull them off to prevent pests from hiding in the debris.
- If leaves are yellow/translucent and mushy, it is overwatering, not reabsorption.
Prevention
Ensure the plant is receiving enough light. High light levels slow down the rate of reabsorption.
How much light does my Echeveria need?
Echeveria etiolation stems from three critical environmental failures: (1) Insufficient light intensity below CAM photosynthesis thresholds (Echeveria require 1000-3000 foot-candles minimum), (2) Poor light quality from narrow-spectrum LEDs (cheap blurple lights lack full PAR range), and (3) Inconsistent photoperiods disrupting circadian growth rhythms
87%
How much light does my Echeveria need?
Echeveria etiolation stems from three critical environmental failures: (1) Insufficient light intensity below CAM photosynthesis thresholds (Echeveria require 1000-3000 foot-candles minimum), (2) Poor light quality from narrow-spectrum LEDs (cheap blurple lights lack full PAR range), and (3) Inconsistent photoperiods disrupting circadian growth rhythms
Cause
Echeveria etiolation stems from three critical environmental failures: (1) Insufficient light intensity below CAM photosynthesis thresholds (Echeveria require 1000-3000 foot-candles minimum), (2) Poor light quality from narrow-spectrum LEDs (cheap blurple lights lack full PAR range), and (3) Inconsistent photoperiods disrupting circadian growth rhythms. Indoor environments typically provide only 100-500 lux near windows versus the 10,000+ lux Echeveria require for compact growth.
Solutions
- 1. Light measurement: Download lux meter app, measure at plant position—target minimum 10,000 lux for compact growth
- 2. Upgrade lighting: Replace cheap blurple USB lights with full-spectrum white LED panels (3000-6500K color temperature)
- 3. Distance optimization: Position grow lights 12-18 inches from Echeveria crowns—use hand heat test (should not feel warmth)
- 4. Timer automation: Set 12-14 hour consistent photoperiod with programmable timer to maintain circadian consistency
- 5. Window optimization: South-facing windows provide brightest light; east-facing acceptable for 4-6 hours morning sun
- 6. Seasonal adjustment: Increase supplemental lighting duration to 16 hours in winter when natural light decreases
- 7. Acclimation protocol: When increasing light, raise intensity gradually over 7-10 days to prevent photobleaching/sunburn
Prevention
Implement year-round supplemental lighting strategy: Position plants within 12-18 inches of full-spectrum LED panels delivering 200-400 μmol/m²/s PAR. Use programmable timers for consistent 12-16 hour photoperiods. Rotate plants weekly to prevent unilateral phototropism. Group Echeveria to create microclimate with 40-60% humidity.
Why is my Echeveria losing its variegation?
Echeverias lose their vibrant coloration and become pale or green when light intensity is insufficient for anthocyanin and carotenoid production
81%
Why is my Echeveria losing its variegation?
Echeverias lose their vibrant coloration and become pale or green when light intensity is insufficient for anthocyanin and carotenoid production
Cause
Echeverias lose their vibrant coloration and become pale or green when light intensity is insufficient for anthocyanin and carotenoid production. These pigments require high light to develop and serve protective functions against UV damage. Without adequate light (minimum 6 hours bright indirect), the plant reverts to chlorophyll-dominant green to maximize photosynthetic efficiency.
Solutions
- 1. Assess current light: If plant is more than 3 feet from brightest window, move closer to light source.
- 2. Gradual relocation: Move 6 inches closer to window every 3 days over 2 weeks to prevent sunburn while increasing light exposure.
- 3. Supplement with artificial light: Position under full-spectrum LED grow light 6-8 inches above plant for 12-14 hours daily if natural light inadequate.
- 4. Rotate weekly: Give pots quarter-turn weekly to ensure all sides receive equal light exposure and maintain uniform coloration.
- 5. Be patient: Color restoration takes 4-6 weeks after light improvement. New growth in center will show improved color first.
Prevention
Provide 6+ hours of bright indirect light daily. South or east-facing windows are optimal. Variegated cultivars require more light (8+ hours) than solid green varieties.
Echeveria: Recovery Timeline
Post-etiolation recovery follows predictable biological timelines that often cause premature abandonment of viable plants
86%
Echeveria: Recovery Timeline
Post-etiolation recovery follows predictable biological timelines that often cause premature abandonment of viable plants
Cause
Post-etiolation recovery follows predictable biological timelines that often cause premature abandonment of viable plants. Echeveria prioritize root system repair and photosynthetic adjustment before allocating energy to visible new growth. This delay—typically 2-6 weeks—reflects CAM metabolism adaptation, chlorophyll redistribution, and meristem reactivation. Owners often conclude treatment failed and discard plants during normal recovery phases.
Solutions
- 1. Week 1-2 (Adjustment): No visible changes expected; plant is callusing wounds, initiating root primordia, and redistributing chlorophyll. Leaves may appear slightly more turgid.
- 2. Week 3-4 (Root emergence): Gently unpot to verify new white root tips emerging from cut ends or buried stems. Do not disturb more than once every 2 weeks.
- 3. Week 5-6 (New growth): First compact new leaves emerge from rosette center or buried nodes. These should show tighter internode spacing indicating adequate light.
- 4. Week 7-8 (Stabilization): New growth accelerates; etiolated lower leaves may be removed once plant shows consistent compact growth pattern.
- 5. Month 3+ (Resume normal care): Plant enters active growth phase; resume minimal fertilization at 1/4 strength if desired
- 6. Warning signs to watch: Mushy blackening at cut ends indicates rot—trim immediately and re-callus; continued stretching indicates insufficient light—upgrade lighting
- 7. Success indicators: Compact new growth with <0.3 inch internode spacing, firm leaf texture, and rosy/pink coloration (in pigmented varieties) confirm recovery
Prevention
Document baseline photos when implementing recovery protocols. Mark calendar reminders at weeks 2, 4, and 6 to track expected milestones. Resist urge to overwater during recovery—wet soil promotes rot in stressed plants.
What is the best soil mix for Echeveria?
Echeveria species require rapid drainage and aeration to prevent root rot
83%
What is the best soil mix for Echeveria?
Echeveria species require rapid drainage and aeration to prevent root rot
Cause
Echeveria species require rapid drainage and aeration to prevent root rot. Standard potting mixes retain too much moisture, and organic materials like peat can become hydrophobic when dry, creating uneven moisture. Echeveria roots need substrates that drain within seconds and dry within days.
Solutions
- 1. Mix 50% commercial cactus/succulent soil with 50% inorganic material (perlite, pumice, or coarse sand)
- 2. Ensure particle size is 3-6mm for optimal air pockets and drainage - avoid fine sand which compacts
- 3. Always use pots with drainage holes - non-negotiable for Echeveria health
- 4. For humid climates, increase inorganic ratio to 70% for better drainage
- 5. Test drainage by watering and observing if water flows freely from holes within seconds
Prevention
Replace soil annually or when it breaks down; adjust mix ratios based on local humidity - more grit in humid climates; never use garden soil without amendment; ensure pots are appropriately sized - shallow pots dry faster than deep ones
What is the best soil mix for Echeveria?
Succulents like Sedum employ Crassulacean Acid Metabolism (CAM) photosynthesis, storing water in specialized mesophyll tissue
91%
What is the best soil mix for Echeveria?
Succulents like Sedum employ Crassulacean Acid Metabolism (CAM) photosynthesis, storing water in specialized mesophyll tissue
Cause
Succulents like Sedum employ Crassulacean Acid Metabolism (CAM) photosynthesis, storing water in specialized mesophyll tissue. This adaptation requires rapid soil drying between waterings to prevent anaerobic root conditions. Standard potting soil retains excess moisture through fine peat particles that compact within 2-3 months, creating waterlogged anaerobic zones below 2mg/L oxygen threshold even with careful watering.
Solutions
- Mix soil at 1:1 to 2:1 ratio of inorganic grit to organic potting soil—50% commercial succulent/cactus mix plus 50% perlite or pumice for indoor conditions
- Test drainage: Water should exit drainage holes within 30 seconds; if slower, add more perlite
- Repot annually with fresh mix to prevent organic matter decomposition and compaction
- Bottom-water only when necessary to control soil saturation levels
- Monitor with moisture meter or wooden skewer—water only when probe comes out completely dry
Prevention
Use 50-70% inorganic amendments (perlite, pumice, coarse sand) in soil mix. Select unglazed terracotta pots which wick moisture through porous walls. Allow soil to dry completely to 2-3 inches depth between waterings—typically every 2-4 weeks depending on season and light exposure.
Echeveria: Stem Burial
Etiolated Echeveria stems remain physiologically viable and capable of adventitious root formation
85%
Echeveria: Stem Burial
Etiolated Echeveria stems remain physiologically viable and capable of adventitious root formation
Cause
Etiolated Echeveria stems remain physiologically viable and capable of adventitious root formation. Rather than discarding stretched stems after beheading, the remaining stem contains dormant meristematic tissue that can generate new root systems when provided appropriate environmental cues. This maximizes plant material utilization and produces fuller, bushier specimens through multiple offset production.
Solutions
- 1. Prepare stem after beheading: Leave 2-4 inches of stem below the beheading cut on the original root system
- 2. Inspect stem health: Verify stem is firm (not mushy/rotten) and green—brown woody stems may still work but with lower success
- 3. Partial bury technique: Gently bury the elongated stem horizontally or at 45° angle, covering up to the remaining leaf nodes while keeping any top growth upright
- 4. Burying depth: Cover stem with 0.5-1 inch of well-draining succulent soil, leaving any small leaves or buds exposed
- 5. Provide intense light: Position in bright indirect or direct sun immediately—new growth requires high PAR to avoid re-etiolation
- 6. Water protocol: Wait 7-10 days before first watering to allow buried stem to callus; then resume normal soak-and-dry cycle
- 7. Timeline: New offsets emerge from buried nodes in 3-6 weeks; stems may root along entire buried length
Prevention
Address etiolation early—stems <3 inches elongation respond best to burial technique. Woody, corked stems older than 6 months have reduced meristematic activity and lower success rates.
Common Questions
Frequently Asked Questions
Why does my echeveria have Beheading propagation?
Cause: When Echeveria become etiolated (stretched from low light), the elongated stems weaken and cannot support the rosette properly, leading to instability, leaf yellowing, and poor aesthetics. The tissue remains viable but the structural integrity is compromised. Beheading (cutting the terminal rosette from the elongated stem) allows propagation of the healthy crown while the remaining stem can produce new offsets.
Solution: 1. Select sterilized cutting tool: Use clean razor blade or sharp scissors wiped with 70% isopropyl alcohol
Prevention: Prevent etiolation through adequate lighting (6+ hours direct sun). Regularly monitor stem length—compact Echeveria should have <0.5 inch internode spacing. Address stretching early before stems become woody and difficult to cut.
88% confidence · View full protocol →
Why does my echeveria have Etiolation?
Cause: Echeveria require higher light levels than many other succulents. In low light, they stretch their stems rapidly, losing the compact rosette shape.
Solution: Behead the plant: Cut the healthy compact top off, leaving 1-2 inches of stem.
Prevention: Provide 6-8 hours of direct morning sun or strong grow lights. Monitor leaf angle: if leaves turn downward, it needs more light.
94% confidence · View full protocol →
Why does my echeveria have Sunburn?
Cause: Succulents grown in low-light indoor conditions develop thin, etiolated leaves with reduced cuticular wax and insufficient photoprotective pigments (anthocyanins, carotenoids). When abruptly exposed to direct sunlight or intense grow lights, the leaf epidermal cells undergo photoxidative damage—cellular rupture from reactive oxygen species (H2O2) buildup due to rapid photosystem imbalance. The tissue cannot dissipate excess energy, causing chlorophyll degradation and cell death that appears as bleached, brown, or crispy patches typically on the most exposed leaf surfaces.
Solution: Immediately move affected plant to bright indirect light only—stop all direct sun exposure
Prevention: Acclimate all light transitions gradually over 7-14 days: begin with 1-2 hours of morning sun or filtered light, increasing exposure by 30-60 minutes daily. Use sheer curtains or 50-70% shade cloth initially. Maintain plants in bright indirect light (not deep shade) before any transition to build baseline resilience.
92% confidence · View full protocol →
Why does my echeveria have Dropping leaves?
Cause: Echeveria naturally reabsorb their oldest (bottom) leaves to fuel new growth at the center. This is normal growth, not a health issue.
Solution: If leaves are crispy and dry, gently pull them off to prevent pests from hiding in the debris.
Prevention: Ensure the plant is receiving enough light. High light levels slow down the rate of reabsorption.
91% confidence · View full protocol →
Why does my echeveria have Overwatering root rot?
Cause: Echeveria succulents store water in fleshy leaves and rosettes, making them highly susceptible to root rot when soil remains moist for extended periods. Anaerobic conditions develop when the soil water content exceeds field capacity for 7+ days, promoting bacterial and fungal pathogens (Pythium, Fusarium) that colonize the shallow, fine root system. The rosette growth habit traps moisture at the stem base, accelerating crown rot that can kill the plant within 2-4 weeks of symptom onset.
Solution: Inspect immediately: Remove plant from pot and examine roots—healthy roots are white and firm, rotted roots are black/brown and mushy
Prevention: Implement 'soak and dry' watering: Water only when top 2-3 inches of soil are bone-dry (typically every 2-3 weeks indoors). Use terracotta pots with drainage holes to wick excess moisture. Maintain 40-50% humidity and bright indirect light to accelerate soil drying. Never let Echeveria sit in saucers of standing water.
91% confidence · View full protocol →
Common Questions
Frequently Asked About Echeveria
What problems can Echeveria get?
Our database contains 19 documented Echeveria cases covering 15 distinct topics, including diseases, pest identification, environmental stress, propagation, and advanced care protocols — each with verified solutions.
Structured Learning
Ready to Go Deeper?
Explore our Mastery Packs for structured, video-based learning with step-by-step protocols from 20,000+ analyzed plant cases.
Browse All Courses →