PANEL 1411-P07 New finding: humidity ≠ brown tips in 96% of cases EVIDENCE Monstera fenestration linked to light hours, not age GRAIL 2,703 verified diagnoses and counting STUDY Overwatering confirmed as #1 killer across all species NEW Snake plant rot rescue protocol updated DATA 20,000+ raw cases analyzed across 216 species PANEL 1411-P07 New finding: humidity ≠ brown tips in 96% of cases EVIDENCE Monstera fenestration linked to light hours, not age GRAIL 2,703 verified diagnoses and counting STUDY Overwatering confirmed as #1 killer across all species NEW Snake plant rot rescue protocol updated DATA 20,000+ raw cases analyzed across 216 species
Monstera Adansonii — care guide and common problems
Monstera Adansonii

monstera adansonii

Monstera adansonii

Evidence-based care guide for Monstera Adansonii (Monstera adansonii). Covers symptom diagnosis, disease treatment, pest control, propagation methods and watering. Our analysis draws from 22 verified community cases with an average confidence score of 84%. Each protocol is synthesized from real rescue outcomes, not generic advice.

22 diagnoses
Avg. confidence 84%

Care Essentials

Get to Know Your Monstera Adansonii

The #1 killer? Overwatering. Let the soil dry between waterings and your Monstera Adansonii will thrive.

Light

bright indirect

Wants bright, indirect light — sensitive to both extremes. Too much direct sun causes burns, too little causes stretching.

💡 Grow lights: Thrives under artificial grow lights (LED or fluorescent, 10-12 hours/day). A great option if your space lacks natural light.

Watering

every 7-10 days

Water when the top 1-2 inches of soil feel dry. Adjust with the seasons — less in winter, more in summer.

Humidity & Temperature

Loves higher humidity (60%+). If your air is dry, group it with other plants, use a pebble tray, or run a humidifier nearby.

Standard room temperature (60-80°F / 15-27°C) is perfect. Avoid cold drafts and sudden temperature swings.

Soil

Needs well-draining soil — add perlite or orchid bark to a standard potting mix. Good drainage is critical to prevent root rot.

Difficulty moderate

Care Requirements

At a Glance

Care Profile in Development

While our detailed care profile is being compiled, you can find specific care guidance in the 1 care-related diagnoses below — including watering schedules, light requirements, and propagation methods from real-world cases.

Start Here

Most Common Problems

Based on 22 analyzed cases — these are the issues you're most likely to encounter

Don't see your symptom? Search all 16 topics below, or run the Diagnostic.

Free Diagnostic

Which of the 7 killers is threatening your plants? Take the 60-second quiz — we'll tell you exactly.

60 seconds · Free

Which of the 7 Killers
is threatening your plants?

We analyzed 1,616 documented plant deaths to identify the 7 causes behind 78% of all losses. Answer 5 questions — we'll tell you exactly which ones apply to your setup.

Skip the quiz — get The 7 Killers course ($19) →

Question 1 of 5

How do you decide when to water your plants?

Question 2 of 5

Where do most of your plants live?

Question 3 of 5

What's your home environment like?

Question 4 of 5

Have you lost a plant in the last 6 months?

Question 5 of 5

How often do you check your plants for pests?

🔬

Your diagnosis is ready

We've identified your top 2 risk killers. Enter your email to see the full breakdown and your personalized rescue protocol.

No spam. One-click unsubscribe anytime.

Your Plant Mortality Diagnosis

Your plants are most at risk from:

The 7 Killers: What 1,616 Dead Houseplants Taught Us — $19 mini-course

The 7 Killers mini-course covers every one of these in depth — mechanism, rescue protocol, prevention. 1,616 cases. 7 lessons. $19.

Get The 7 Killers — $19 →

Read the full mortality report (free) →

Get the Plant Mortality Checklist

The 7 killers behind 78% of houseplant deaths — and the exact fix for each. Free PDF based on 1,616 documented cases.

Free. No spam. Unsubscribe anytime.

Verified Data

All Diagnoses

16 topics consolidated from 22 documented cases. Expand any topic to see all protocols.

Symptoms (1 topics · 1 cases)

Why are my Monstera Adansonii leaves turning yellow?

Yellow leaves in Monstera adansonii indicate environmental stress with three primary etiologies: (1) Overwatering-induced root hypoxia—soil saturation >7 days creates anaerobic conditions (<2mg/L dissolved oxygen) leading to bacterial root rot, (2) Underwatering—soil bone-dry for 10+ days causes cellular dehydration and chlorophyll degradation, (3) Light stress—direct sun exposure causes photooxidative damage, insufficient light (<500 lux) triggers etiolation yellowing

78%
Cause

Yellow leaves in Monstera adansonii indicate environmental stress with three primary etiologies: (1) Overwatering-induced root hypoxia—soil saturation >7 days creates anaerobic conditions (<2mg/L dissolved oxygen) leading to bacterial root rot, (2) Underwatering—soil bone-dry for 10+ days causes cellular dehydration and chlorophyll degradation, (3) Light stress—direct sun exposure causes photooxidative damage, insufficient light (<500 lux) triggers etiolation yellowing. Sap-sucking pests (thrips, spider mites) also cause mottled chlorosis.

Solutions
  • Check soil moisture: insert finger 3 inches deep—if wet with yellowing, reduce watering frequency to 7-14 days
  • If dry: water thoroughly until drainage; adjust schedule based on season
  • Inspect roots: unpot and check for black/mushy roots (rot) vs dry/shriveled (underwatering)
  • Examine leaf undersides: look for thrips (slender tan insects) or spider mite stippling
  • Adjust light: move away from direct sun or toward brighter indirect location
  • Prune fully yellow leaves at base to redirect energy
Prevention

Use finger test: water only when top 2-3 inches soil are dry. Position in bright indirect light (2000-4000 lux). Inspect leaf undersides weekly for pest frass (black specks) and stippling damage.

Diseases (1 topics · 5 cases)

Why does my Monstera Adansonii have root rot?

Monstera adansonii develops root rot when epiphytic aerial roots are confined in dense, moisture-retentive potting soil for 7+ days without oxygen exchange

5 protocols 86–91%

Protocol 1: root rot · 91% confidence

Cause

Monstera adansonii develops root rot when epiphytic aerial roots are confined in dense, moisture-retentive potting soil for 7+ days without oxygen exchange. The root system's native adaptation to clinging bark and rapid drainage creates vulnerability to anaerobic bacterial proliferation (Pythium, Phytophthora) when soil remains saturated below the surface. Unlike visible wilting from underwatering, root rot produces telltale early signals: subtle basal leaf yellowing, slowed new growth, and a musty odor from the soil that appears dry on top.

Solutions
  • Gently unpot and inspect: Healthy roots appear white, firm, and rope-like; rotting roots are brown/black, mushy, and detach easily
  • Trim all affected roots with sterilized scissors, cutting 1cm into healthy tissue to ensure complete removal
  • Sterilize remaining root mass: Soak in 3% hydrogen peroxide solution (1:1 with water) for 15-20 minutes to kill pathogens
  • Allow cut surfaces to callus for 48 hours in bright indirect light to seal wounds against reinfection
  • Repot in completely dry, chunky aroid mix; do not water for 7 days to allow root recovery
Prevention

Water only when the top 2 inches of soil are completely dry; use well-draining aroid mix (50% potting soil, 30% perlite, 20% bark); match pot size to root ball (roots should fill 70-80% of container); elevate pot on feet to improve drainage; avoid automated watering systems that maintain constant moisture.

Protocol 2: root rot crown damage · 89% confidence

Cause

Advanced root rot in Monstera adansonii occurs when anaerobic conditions persist for 14+ days, allowing pathogens to colonize the rhizome crown. The plant's hemiepiphytic nature makes it particularly susceptible to crown rot once infection reaches the central growing point. Unlike other Monsteras, adansonii's compact growth habit concentrates moisture at the stem base, accelerating rot spread from roots into the crown tissue where new leaves emerge.

Solutions
  • Immediate unpotting: Remove all soil and rinse roots under lukewarm water to assess full extent of rot
  • Surgical removal: Trim ALL mushy, blackened, or foul-smelling roots and any soft crown tissue until only firm, white tissue remains
  • Hydrogen peroxide treatment: Soak remaining healthy tissue in 3% H2O2 (full strength) for 20-30 minutes to oxygenate and sterilize
  • Callus formation: Lay the plant on dry paper towel in shade for 72 hours to allow all cut surfaces to seal completely
  • Emergency propagation: If crown is compromised, take stem cuttings with 2-3 nodes each, callus for 48 hours, then root in damp sphagnum moss (not water) for 4-6 weeks
  • Recovery environment: Maintain 70-80% humidity, 70-75°F temperatures, and bright indirect light during the 6-10 week recovery period
Prevention

Inspect roots monthly by gently lifting the plant from its pot; use clear nursery pots to monitor root health visually without disturbance; maintain 60-80% humidity to reduce water needs; position in bright indirect light (2000-5000 lux) to promote transpiration and prevent moisture retention; never let the plant sit in standing water.

Protocol 3: root rot oversized pot · 88% confidence

Cause

Monstera adansonii root rot frequently stems from oversized pot syndrome, where the root ball occupies less than 40% of the container volume. The excess soil creates a perched water table that remains saturated for weeks despite the surface appearing dry. Aroids like adansonii evolved with minimal soil contact in their native epiphytic habitat; their fine root hairs cannot extract oxygen from waterlogged soil zones, triggering anaerobic bacterial growth that spreads upward into viable roots. This explains why root rot develops even with careful watering schedules.

Solutions
  • Assess root-to-soil ratio: Healthy roots should fill 70-80% of pot volume; if below 40%, pot is too large
  • Downsize immediately: Select a pot where roots touch the bottom and sides with only 1 inch clearance
  • Soil amendment: Create airy aroid mix (40% potting soil, 30% perlite, 30% bark) to maximize drainage in remaining soil volume
  • Root inspection: While downsizing, check for early rot signs (brown tips, mushy sections) and trim if present
  • Adjust watering: With less soil volume, water less frequently; use finger test at 2-inch depth before each watering
  • Monitor for 4-6 weeks: Expect improved growth and reduced leaf drop as roots establish in appropriately sized container
Prevention

Match pot diameter to root spread with no more than 1-2 inches of clearance; choose clear nursery pots to visually confirm root fill; refresh soil annually as organic matter breaks down and compacts; use terracotta or unglazed ceramic to wick excess moisture through porous walls; never repot into containers more than one size up from current root dimensions.

Protocol 4: root rot shipping stress · 87% confidence

Cause

Shipped Monstera adansonii frequently arrive with compromised root systems due to tissue culture origin, extended transit in moisture-retentive media, and anaerobic packaging conditions. The combination of sterile lab-to-soil transition shock, reduced oxygen availability during 3-7 day shipping, and bacterial ingress creates perfect rot conditions. Unlike established plants, imports lack beneficial soil microbes that suppress pathogens. Root rot develops within 3-7 days of arrival, often before visible symptoms appear above ground.

Solutions
  • Immediate triage: Unpot within 24 hours of arrival—do not wait for visible distress
  • Root inspection: Rinse all shipping medium off with lukewarm water; examine every root for softness, dark coloration, or mushy texture
  • Surgical intervention: Trim ALL compromised roots with sterilized scissors; remove roots that detach easily or show brown/black discoloration
  • Sterilization: Treat remaining healthy roots with 3% hydrogen peroxide soak for 15-20 minutes OR dust cut ends with cinnamon powder
  • Propagation recovery: Root cleaned stem sections in damp sphagnum moss (NOT water) for 4-6 weeks—moss provides oxygen plus moisture balance that stressed roots require
  • Environment stabilization: Use clear orchid pots to monitor root recovery without disturbance; maintain 75-80% humidity and bright indirect light
  • H2O2 maintenance: Add 1-2ml of 3% hydrogen peroxide per liter of water for first 4 waterings to maintain sterile conditions
Prevention

Source from sellers who harden tissue-cultured plants for 4-6 weeks post-lab; quarantine all imports for 14 days in high-humidity (70-80%) recovery chamber; inspect roots immediately upon arrival rather than waiting for symptoms; maintain 70-75°F temperatures with heating mats to accelerate root metabolism; avoid fertilizing until 4+ weeks post-arrival when root function normalizes.

Protocol 5: root rot propagation failure · 86% confidence

Cause

Monstera adansonii propagation frequently fails due to root type confusion. Water-adapted roots (fine, white, hair-like) develop in propagation vessels and excel at aquatic oxygen exchange, but rapidly rot when transitioned to soil due to structural differences and microbial adaptation. Conversely, soil-adapted roots (thicker, brown, rope-like) that develop from aerial roots entering potting mix will suffocate and rot in water due to their thicker cuticle and different respiration requirements. This fundamental incompatibility causes propagation failure even when techniques appear correct.

Solutions
  • Root type assessment: Examine root structure—fine white hair-like roots = water-adapted; thicker brown rope-like = soil-adapted
  • For soil-originated roots in rot recovery: Transfer immediately to damp sphagnum moss or chunky soil—avoid water as soil roots rot quickly in aquatic environments
  • For water propagation: Change water every 3-4 days using dechlorinated water; add 1-2% hydrogen peroxide to inhibit bacterial growth; use opaque containers to reduce algae
  • Transition protocol: When water roots reach 2-3 inches, shift to damp sphagnum moss for 2-3 weeks before soil to acclimate roots to moisture-retentive but aerated medium
  • Soil mix for transition: Use extra-perlite mix (50% potting soil, 25% perlite, 25% bark) for first potting to ease the water-to-soil transition
  • Timing: Expect 6-8 weeks total from cutting to established soil plant; resist disturbing roots during this vulnerable period
Prevention

Identify root type before selecting propagation medium; use sphagnum moss for transitioning between water and soil phases; limit water propagation to 4-6 weeks maximum; add hydrogen peroxide (1-2ml per liter) to propagation water weekly to prevent anaerobic bacterial growth; ensure water is dechlorinated and at room temperature to reduce stress on developing tissue.

Pests (2 topics · 3 cases)

What pests are on my Monstera Adansonii?

Thrips are the primary pest affecting Monstera adansonii indoors

90%
Cause

Thrips are the primary pest affecting Monstera adansonii indoors. These tiny insects rasp leaf tissue and suck sap, causing silvery stippling, black fecal specks, and distorted new growth. Thrips complete lifecycle in 2-3 weeks with soil-pupating stage that evades foliar sprays. Spider mites and mealybugs also occur in low humidity. Pest issues increase when plants are stressed from improper care.

Solutions
  • Isolate infested plant immediately - thrips spread rapidly to nearby plants
  • Confirm thrips presence by shaking leaf over white paper - tiny moving specks indicate infestation
  • Apply spinosad (Captain Jack's Dead Bug Brew) as soil drench and foliar spray - targets all life stages
  • Rotate treatments every 5-7 days: insecticidal soap → neem oil → alcohol spray (70% diluted 1:1) for 4-6 weeks
  • Replace top 2-3 inches of soil after 2 weeks to eliminate pupae; add beneficial nematodes (Steinernema feltiae) for soil stage
  • Continue treatment 2-3 weeks after visible pests disappear - eggs and pupae remain hidden
  • For severe infestations: prune heavily damaged leaves and dispose securely
Prevention

Quarantine new plants 2-4 weeks before introducing to collection. Maintain 60%+ humidity to deter spider mites. Inspect leaf undersides weekly with magnifying glass. Use yellow sticky traps for early thrips detection. Avoid over-fertilizing with nitrogen which attracts pests.

Why does my Monstera Adansonii have thrips?

Thrips (Frankliniella and Thrips spp

2 protocols 73–91%

Protocol 1: thrips · 91% confidence

Cause

Thrips (Frankliniella and Thrips spp.) have a unique complete metamorphosis lifecycle that includes a soil-dwelling pupal stage. After feeding on Monstera adansonii foliage as larvae, thrips drop to the soil to pupate in the top 2-3 inches of substrate for 2-5 days before emerging as winged adults. This soil phase is invisible and resistant to foliar sprays, creating a reinfestation cycle every 2-3 weeks if not targeted specifically.

Solutions
  • Apply soil drench with spinosad or neem oil solution (1 tsp neem + 1/4 tsp dish soap per liter water) directly to soil surface until water drains from bottom
  • Replace top 2-3 inches of soil with sterile potting mix 24 hours after soil drench treatment
  • Add beneficial nematodes to soil (follow package rates) to target pupal stage thrips hiding below surface
  • Use yellow sticky traps positioned horizontally at soil surface to catch adults as they emerge from pupation
  • Maintain 4-6 week treatment cycle even after visible thrips disappear to ensure complete lifecycle elimination
Prevention

Replace top 2-3 inches of soil with fresh sterile mix after initial treatment; use yellow sticky traps at soil surface to intercept emerging adults; apply beneficial nematodes (Steinernema feltiae) monthly to soil for continuous pupae predation; quarantine new plants for 14 days with soil inspection.

Protocol 2: thrips pests · 73% confidence

Cause

Thrips (Thysanoptera) infestation on Monstera adansonii occurs through adult migration or contaminated cuttings. These sap-sucking insects pierce leaf epidermis to feed on mesophyll cells, causing characteristic silver stippling and black frass (fecal specks). Thrips lay eggs inside leaf tissue making elimination difficult. Populations persist in water propagation because adults and larvae complete lifecycle on plant tissue—no soil phase required. Reproduction continues every 7-14 days with multiple generations overlapping.

Solutions
  • Inspect damage: silvery stippling, curled new growth, and black frass confirm thrips
  • Isolate immediately: move cutting to separate room to prevent spread to other plants
  • Physical removal: rinse cutting under lukewarm water every 3-4 days dislodging adults and larvae
  • Insecticidal treatment: apply insecticidal soap or neem oil every 4-7 days for 3-4 cycles to break egg hatch cycle
  • Persistence required: eggs hatch over 2-3 weeks—treatment must continue 21+ days minimum
  • Severe infestations: discard cutting to protect collection; thrips are highly mobile and difficult to eradicate
Prevention

Inspect all new plants and cuttings under magnification before introducing to collection. Isolate propagation vessels. Maintain 60%+ humidity (thrips prefer dry conditions). Use systemic insecticide (imidacloprid) as preventive on high-value specimens.

Environment (1 topics · 1 cases)

Does my Monstera Adansonii need more humidity?

Monstera adansonii requires 60-80% relative humidity for optimal growth

88%
Cause

Monstera adansonii requires 60-80% relative humidity for optimal growth. Low humidity (<50%) causes brown crispy leaf edges, slowed growth, and increased pest susceptibility. High humidity with poor air circulation promotes fungal issues. Humidity affects transpiration rate and aerial root development. Guttation (water droplets on leaf edges) indicates healthy root pressure from adequate moisture.

Solutions
  • Use humidifier in dry months - aim for 60% minimum, 70% ideal for fenestration development
  • Group plants together to create microclimate; tropical plants collectively raise ambient humidity
  • Place pot on pebble tray with water below pebble surface - evaporation increases local humidity
  • Mist aerial roots and moss pole (not leaves) to encourage attachment and moisture absorption
  • Avoid direct humidifier steam on foliage - warm mist causes thermal scorch, use cool-mist ultrasonic models
Prevention

Maintain 60-80% humidity year-round using humidifier, pebble tray, or plant grouping. Monitor with digital hygrometer. Position humidifier 3-6 feet from plant to avoid direct leaf wetting. Ensure good air circulation to prevent stagnant moist air.

Growth & Structure (5 topics · 5 cases)

Should I be concerned about my Monstera Adansonii's aerial roots?

Aerial roots on Monstera adansonii are adventitious structures that emerge from stem nodes in response to humidity and contact stimuli

85%
Cause

Aerial roots on Monstera adansonii are adventitious structures that emerge from stem nodes in response to humidity and contact stimuli. Unlike soil roots that absorb water/nutrients, aerial roots serve dual functions: (1) structural attachment via adhesive pads and root hairs that grip substrate texture, and (2) signal transduction to the shoot apical meristem triggering developmental phase change. Improper attachment techniques damage root primordia or create stem constriction, negating the climbing benefit.

Solutions
  • Identify active nodes: Look for small brown bumps (root primordia) at leaf petiole bases—these are attachment points
  • Use Velcro plant ties or soft twist ties: Create loose 1-inch loops around stems at nodes, securing to support without compression
  • Alternative—nylon stockings method: Cut strips and tie loosely—they stretch as stems thicken
  • For mature aerial roots: Gently press 2-3 inch roots against moist moss pole and secure temporarily with plant tie until natural adhesion occurs
  • Avoid: Wire ties, rubber bands, or tight string which constrict stems and damage vascular tissue
Prevention

Allow aerial roots to emerge naturally—do not force attachment. Use breathable, non-reactive fasteners that expand with stem growth. Maintain pole humidity above 70% to encourage root elongation and adhesive secretion.

Monstera Adansonii: Climbing

Monstera adansonii is a hemiepiphytic aroid that naturally climbs tree trunks in tropical forests

85%
Cause

Monstera adansonii is a hemiepiphytic aroid that naturally climbs tree trunks in tropical forests. Without vertical support, stems become leggy, internodes elongate searching for support, and leaf size decreases. Aerial roots emerge from nodes seeking moss or bark to anchor into. Climbing triggers mature growth phase with larger leaves and more pronounced fenestrations.

Solutions
  • Install moss pole, coco coir pole, or wooden plank at repotting time to avoid root damage
  • Gently tie main stem to support using soft plant ties or velcro straps at 2-3 node intervals
  • Mist aerial roots and moss pole regularly to encourage attachment; roots will naturally grip textured surfaces
  • Position pole close to stem without forcing - stems can be trained gradually over 2-3 weeks
Prevention

Provide climbing support from initial potting. Monstera adansonii reaches 3-8 feet indoors with proper support. Position in bright indirect light near east or west window for optimal vertical growth.

How do I set up a moss pole for my Monstera Adansonii?

In trailing or hanging growth, Monstera adansonii exhibits vine-elongation priority—allocating 70%+ of photosynthate to stem extension in search of vertical substrate

87%
Cause

In trailing or hanging growth, Monstera adansonii exhibits vine-elongation priority—allocating 70%+ of photosynthate to stem extension in search of vertical substrate. This shade-avoidance response produces small, non-fenestrated leaves. When nodes anchor to climbing support, the plant shifts to leaf-expansion priority, increasing individual leaf surface area by 200-400% over 6-12 weeks due to stabilized cell expansion and enhanced vascular connectivity through attached aerial roots.

Solutions
  • Assess current growth: Measure 5 newest leaves—if under 3 inches long without holes, climbing support is needed
  • Install 24-36 inch moss pole or wooden plank in pot center, securing base with stones if top-heavy
  • Attach vines using soft plant ties at 3-4 inch intervals along support, avoiding tight constriction
  • Mist aerial roots and support material 3-4x weekly to encourage attachment
  • Document progress: Photograph leaves monthly to track size increase (expect 2-3x growth over 8-12 weeks)
Prevention

Transition from hanging baskets to vertical supports when vines reach 12+ inches. Maintain consistent bright indirect light (2000-5000 lux) to support the energy demands of larger leaf production.

Monstera Adansonii: Climbing Vs Trailing

Monstera adansonii exhibits growth morphology plasticity based on vertical support availability

72%
Cause

Monstera adansonii exhibits growth morphology plasticity based on vertical support availability. Without climbing cues, the plant maintains juvenile growth habit with smaller leaf size (15-20cm) and simpler fenestration patterns. When provided moss poles or trellises, aerial roots anchor to substrate triggering hormonal changes (auxin redistribution) that stimulate mature leaf morphology including larger blades (25-35cm) and more complex perforation patterns. Energy allocation shifts from stem elongation to leaf expansion under climbing conditions.

Solutions
  • Install moss pole or wooden climbing board in center of pot
  • Gently guide vines toward support using soft plant ties
  • Mist moss pole 2-3x weekly to encourage aerial root attachment
  • Prune trailing stems above nodes to redirect energy to climbing shoots
  • Transition gradually: allow 4-6 weeks for hormonal adjustment and leaf morphological changes
Prevention

Install climbing support when plant reaches 12-18 inches height. Use moss poles for aerial root attachment, wooden boards, or trellises. Position support within 2 inches of growing stems to encourage contact.

How do I set up a moss pole for my Monstera Adansonii?

Monstera adansonii exhibits ontogenetic phase change from juvenile to mature foliage based on cumulative node contact with vertical substrate, not plant age alone

84%
Cause

Monstera adansonii exhibits ontogenetic phase change from juvenile to mature foliage based on cumulative node contact with vertical substrate, not plant age alone. Installing support too late—after vines have elongated 24+ inches in trailing habit—results in extended transition period (12-20 weeks) as the plant reassigns resources from stem elongation to aerial root development. Early installation capitalizes on the plant's natural climbing instinct before apical dominance becomes entrenched in horizontal growth.

Solutions
  • Timing for juvenile plants: Install support when plant reaches 8-12 inches tall, typically 4-6 months after propagation
  • Positioning: Place support within 2-3 inches of the growing stem tip—roots seek substrate by positive thigmotropism (touch response)
  • Height selection: Choose 24-36 inch supports for adansonii (larger than deliciosa); allows for 18-24 months of vertical growth before extension needed
  • Multi-stem plants: Install single large pole (4+ inch diameter) for 3+ stems, or individual supports for separated vines
  • Extension method: When plant outgrows pole, stack extendable sections or gently redirect to new taller support; never let vines hang unsupported
Prevention

Install support when plant has 4-6 leaves and shows initial vining tendency (6-12 inches stem length). Position pot near support structure at time of planting for young specimens. Avoid allowing plants to establish 12+ months of trailing growth before adding vertical support.

Propagation (1 topics · 2 cases)

How do I propagate my Monstera Adansonii?

Monstera adansonii propagates readily from stem cuttings with at least one node

2 protocols 74–87%

Protocol 1: propagation · 87% confidence

Cause

Monstera adansonii propagates readily from stem cuttings with at least one node. Nodes contain meristematic tissue that produces roots. Cuttings without nodes fail to root. Water propagation allows visibility but soil propagation reduces transplant shock. Aerial roots on mature stems accelerate establishment. Propagation succeeds year-round but fastest in spring-summer during active growth.

Solutions
  • Cut stem 1 inch below node with sterilized shears; remove lower leaves leaving 1-2 at top
  • Place cutting in water with node submerged, leaves above surface; refresh water weekly to prevent bacterial growth
  • OR plant directly in moist well-draining mix (50% potting soil, 25% perlite, 25% orchid bark) with node buried
  • Maintain 70-80% humidity using propagation dome or plastic bag tent; place in bright indirect light
  • Wait until roots are 2-3 inches long before transplanting water-propagated cuttings to soil
  • Do not disturb cutting during rooting - new growth indicates successful establishment
Prevention

Take cuttings during growing season (March-September) for fastest rooting. Select healthy stems with 2-3 nodes and at least one mature leaf. Use sterile shears to prevent infection. Expect roots in 2-4 weeks in water, 3-5 weeks in soil.

Protocol 2: water propagation · 74% confidence

Cause

Monstera adansonii water propagation relies on adventitious root formation from nodal meristematic tissue. Root initiation requires water temperature 68-75°F, adequate oxygen exchange (change water every 4-7 days), and node submersion. Rooting hormone (IBA) accelerates callus formation but is not required. Water-propagated roots are morphologically distinct—thinner, more fragile than soil-grown roots—and require 2-3 week hardening period when transitioning to soil to prevent transplant shock.

Solutions
  • Take 4-6 inch cuttings with 2-3 nodes minimum
  • Remove lower leaves to prevent submerged foliage decay
  • Submerge 1-2 nodes in water; aerial roots may emerge from nodes in 7-14 days
  • Change water every 4-5 days using room-temperature dechlorinated water
  • Wait for roots to reach 2-3 inches before soil transition
  • Harden off: pot in moist (not wet) aroid mix; increase humidity to 60%+ for 2 weeks post-transplant
Prevention

Use room-temperature dechlorinated water (let tap water sit 24 hours). Change water every 4-5 days to prevent bacterial biofilm and oxygen depletion. Maintain bright indirect light but avoid direct sun on water vessel (algae growth).

Maintenance (1 topics · 1 cases)

How do I set up a moss pole for my Monstera Adansonii?

Monstera adansonii is an obligate climbing epiphyte native to Central American rainforests where juvenile plants grow as ground-creeping vines until locating a tree trunk

88%
Cause

Monstera adansonii is an obligate climbing epiphyte native to Central American rainforests where juvenile plants grow as ground-creeping vines until locating a tree trunk. Vertical support triggers phenotypic plasticity through ethylene-auxin crosstalk: nodes in contact with climbing structures initiate aerial root primordia within 7-14 days, which then signal the apical meristem to transition from juvenile (small, entire leaves) to mature (fenestrated, perforated) foliage. Without this structural cue, plants remain in genetic juvenile phase indefinitely.

Solutions
  • Select appropriate support: sphagnum moss poles, coir poles, or rough wooden planks provide texture for aerial root grip
  • Install at pot center: Push support 4-6 inches deep into soil to prevent toppling as plant climbs
  • Guide initial attachment: Use soft plant ties or Velcro strips to secure first 2-3 nodes to support without constricting stems
  • Maintain pole moisture: Mist moss poles 2-3x weekly or install self-watering sphagnum poles to encourage root adhesion
  • Monitor transition: First fenestrated leaves typically appear 4-8 weeks after stable aerial root attachment is established
Prevention

Install climbing support when plant reaches 12-18 inches in length or shows active vining behavior. Maintain humidity above 60% to accelerate aerial root attachment. Position support within 2-3 inches of growing stems to encourage contact.

Other Topics (4 topics · 4 cases)

Monstera Adansonii: Fenestration

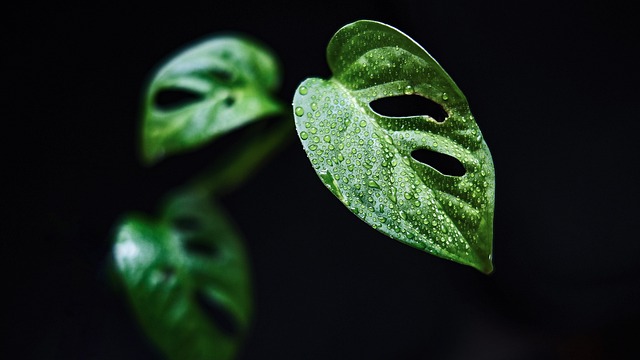
Fenestrations (leaf splits and holes) develop as Monstera adansonii matures and receives adequate light

82%
Cause

Fenestrations (leaf splits and holes) develop as Monstera adansonii matures and receives adequate light. Young juvenile leaves emerge entire (no holes). Fenestration signals transition to mature growth phase, triggered by climbing behavior, increased light exposure, and sufficient nutrients. Leaves without fenestrations indicate insufficient light, immature plant, or lack of climbing support.

Solutions
  • Increase light exposure - move closer to east or west window; fenestrations require 150+ PAR for development
  • Install climbing support - mature fenestrated leaves only develop when plant senses vertical stability
  • Fertilize monthly during growing season with balanced 20-20-20 diluted to quarter strength
  • Be patient - first 3-5 leaves are typically juvenile without fenestrations, this is normal development
Prevention

Provide bright indirect light (200-500 foot-candles). Support vertical climbing to trigger mature growth. Fenestrations typically appear after plant establishes 4-6 mature leaves. Expect 6-12 months for juvenile plants to develop characteristic splits.

Monstera Adansonii: Fenestration Patterns

Fenestration development in Monstera adansonii requires three concurrent factors: plant maturity (12-24 months minimum), bright indirect light (2000-5000 lux for 6-8 hours), and vertical climbing support

75%
Cause

Fenestration development in Monstera adansonii requires three concurrent factors: plant maturity (12-24 months minimum), bright indirect light (2000-5000 lux for 6-8 hours), and vertical climbing support. Young plants produce solid cordate leaves to maximize photosynthetic surface area in low understory light. Without climbing substrate, plants remain hormonally juvenile regardless of age. Insufficient light (<1000 lux) suppresses auxin-mediated leaf differentiation even in mature specimens.

Solutions
  • Increase light exposure: move to bright indirect location (hand shadow test at 12 inches should show defined shadow)
  • Install moss pole or trellis to provide climbing substrate
  • Verify plant age: cuttings from mature plants may produce solid leaves initially; allow 3-4 leaf cycles for maturity expression
  • Check light intensity with meter: target 2000-5000 lux
  • Avoid deep shade locations; supplement with full-spectrum grow lights if necessary
Prevention

Provide bright indirect light 6-8 hours daily from east/west windows or filtered south exposure. Install climbing support when plant reaches 12+ inches. Maintain consistent care for 12-24 months to achieve physiological maturity.

Monstera Adansonii: No Fenestrations

Insufficient photosynthetically active radiation (PAR) below 200-300 foot-candles prevents photomorphogenic development of fenestrations

90%
Cause

Insufficient photosynthetically active radiation (PAR) below 200-300 foot-candles prevents photomorphogenic development of fenestrations. Monstera adansonii requires bright indirect light (2000-5000 lux or 200-500 PPFD) to trigger the genetic expression of leaf perforations. Low light induces shade-adapted juvenile leaf morphology—small, solid leaves optimized for light capture rather than the characteristic Swiss cheese pattern of mature canopy leaves.

Solutions
  • Measure current light: Use phone app or PAR meter to assess intensity at plant canopy level
  • Relocate plant: Move to brighter indirect light position within 1-2m of east or west-facing window
  • Supplement with grow lights: Install full-spectrum LED panels delivering 200-400 PPFD at 12-24 inches above canopy for 12-16 hours daily
  • Monitor new leaf emergence: Expect first fenestrated leaves within 4-8 weeks of achieving adequate light levels
Prevention

Maintain 2000-5000 lux bright indirect light year-round; use PAR meter app to verify intensity; supplement with full-spectrum LED grow lights (12-16 hours/day) during winter or low-light seasons; position 2-3 feet from east/west-facing windows with sheer curtain filtering.

How do I set up a moss pole for my Monstera Adansonii?

While sphagnum moss poles are the industry standard for aroid climbing support, Monstera adansonii aerial roots can adhere to diverse substrates including coconut coir, rough cedar planks, bamboo stakes, cork bark, and even textured PVC pipes

86%
Cause

While sphagnum moss poles are the industry standard for aroid climbing support, Monstera adansonii aerial roots can adhere to diverse substrates including coconut coir, rough cedar planks, bamboo stakes, cork bark, and even textured PVC pipes. Each material offers trade-offs: moss provides superior humidity retention and root hydration but requires frequent misting; coir offers durability and natural texture but dries faster; wood provides authentic rainforest simulation with natural antifungal compounds but may degrade over 2-3 years.

Solutions
  • Option 1—Sphagnum moss poles: Best for dry environments; wrap PVC pipe with live sphagnum, mist 3-4x weekly, or use extendable self-watering poles
  • Option 2—Coconut coir poles: Durable 3-5 year lifespan; retains some moisture, excellent texture for root grip, lower maintenance than moss
  • Option 3—Cedar or redwood planks: Natural antifungal properties; mount vertically in pot, rough side facing plant; aesthetically mimics tree trunks
  • Option 4—Cork bark tubes: Lightweight, natural look, excellent for multiple aerial root attachment points; humidity retention moderate
  • Option 5—Bamboo or wooden stakes with jute wrapping: Budget option—wrap smooth stakes with natural fiber twine to create grip texture
Prevention

Match support material to growing environment: High-humidity homes (60%+) suit coir or wood; dry environments (<50% humidity) require moss poles or self-watering systems. Always select untreated, chemical-free materials to avoid root damage.

Common Questions

Frequently Asked Questions

Why does my monstera adansonii have Root rot?

Cause: Monstera adansonii develops root rot when epiphytic aerial roots are confined in dense, moisture-retentive potting soil for 7+ days without oxygen exchange. The root system's native adaptation to clinging bark and rapid drainage creates vulnerability to anaerobic bacterial proliferation (Pythium, Phytophthora) when soil remains saturated below the surface. Unlike visible wilting from underwatering, root rot produces telltale early signals: subtle basal leaf yellowing, slowed new growth, and a musty odor from the soil that appears dry on top.

Solution: Gently unpot and inspect: Healthy roots appear white, firm, and rope-like; rotting roots are brown/black, mushy, and detach easily

Prevention: Water only when the top 2 inches of soil are completely dry; use well-draining aroid mix (50% potting soil, 30% perlite, 20% bark); match pot size to root ball (roots should fill 70-80% of container); elevate pot on feet to improve drainage; avoid automated watering systems that maintain constant moisture.

91% confidence · View full protocol →

Why does my monstera adansonii have Thrips?

Cause: Thrips (Frankliniella and Thrips spp.) have a unique complete metamorphosis lifecycle that includes a soil-dwelling pupal stage. After feeding on Monstera adansonii foliage as larvae, thrips drop to the soil to pupate in the top 2-3 inches of substrate for 2-5 days before emerging as winged adults. This soil phase is invisible and resistant to foliar sprays, creating a reinfestation cycle every 2-3 weeks if not targeted specifically.

Solution: Apply soil drench with spinosad or neem oil solution (1 tsp neem + 1/4 tsp dish soap per liter water) directly to soil surface until water drains from bottom

Prevention: Replace top 2-3 inches of soil with fresh sterile mix after initial treatment; use yellow sticky traps at soil surface to intercept emerging adults; apply beneficial nematodes (Steinernema feltiae) monthly to soil for continuous pupae predation; quarantine new plants for 14 days with soil inspection.

91% confidence · View full protocol →

Why does my monstera adansonii have Propagation?

Cause: Monstera adansonii propagates readily from stem cuttings with at least one node. Nodes contain meristematic tissue that produces roots. Cuttings without nodes fail to root. Water propagation allows visibility but soil propagation reduces transplant shock. Aerial roots on mature stems accelerate establishment. Propagation succeeds year-round but fastest in spring-summer during active growth.

Solution: Cut stem 1 inch below node with sterilized shears; remove lower leaves leaving 1-2 at top

Prevention: Take cuttings during growing season (March-September) for fastest rooting. Select healthy stems with 2-3 nodes and at least one mature leaf. Use sterile shears to prevent infection. Expect roots in 2-4 weeks in water, 3-5 weeks in soil.

87% confidence · View full protocol →

Why does my monstera adansonii have Pests?

Cause: Thrips are the primary pest affecting Monstera adansonii indoors. These tiny insects rasp leaf tissue and suck sap, causing silvery stippling, black fecal specks, and distorted new growth. Thrips complete lifecycle in 2-3 weeks with soil-pupating stage that evades foliar sprays. Spider mites and mealybugs also occur in low humidity. Pest issues increase when plants are stressed from improper care.

Solution: Isolate infested plant immediately - thrips spread rapidly to nearby plants

Prevention: Quarantine new plants 2-4 weeks before introducing to collection. Maintain 60%+ humidity to deter spider mites. Inspect leaf undersides weekly with magnifying glass. Use yellow sticky traps for early thrips detection. Avoid over-fertilizing with nitrogen which attracts pests.

90% confidence · View full protocol →

Why does my monstera adansonii have No fenestrations?

Cause: Insufficient photosynthetically active radiation (PAR) below 200-300 foot-candles prevents photomorphogenic development of fenestrations. Monstera adansonii requires bright indirect light (2000-5000 lux or 200-500 PPFD) to trigger the genetic expression of leaf perforations. Low light induces shade-adapted juvenile leaf morphology—small, solid leaves optimized for light capture rather than the characteristic Swiss cheese pattern of mature canopy leaves.

Solution: Measure current light: Use phone app or PAR meter to assess intensity at plant canopy level

Prevention: Maintain 2000-5000 lux bright indirect light year-round; use PAR meter app to verify intensity; supplement with full-spectrum LED grow lights (12-16 hours/day) during winter or low-light seasons; position 2-3 feet from east/west-facing windows with sheer curtain filtering.

90% confidence · View full protocol →

Common Questions

Frequently Asked About Monstera Adansonii

Can Monstera Adansonii grow in water?

Yes. We have 1 documented protocol for water-based Monstera Adansonii care, including propagation and long-term hydroponic transition.

What problems can Monstera Adansonii get?

Our database contains 22 documented Monstera Adansonii cases covering 16 distinct topics, including diseases, pest identification, environmental stress, propagation, and advanced care protocols — each with verified solutions.

Structured Learning

Ready to Go Deeper?

Explore our Mastery Packs for structured, video-based learning with step-by-step protocols from 20,000+ analyzed plant cases.

Browse All Courses →