PANEL 1411-P07 New finding: humidity ≠ brown tips in 96% of cases EVIDENCE Monstera fenestration linked to light hours, not age GRAIL 2,703 verified diagnoses and counting STUDY Overwatering confirmed as #1 killer across all species NEW Snake plant rot rescue protocol updated DATA 20,000+ raw cases analyzed across 216 species PANEL 1411-P07 New finding: humidity ≠ brown tips in 96% of cases EVIDENCE Monstera fenestration linked to light hours, not age GRAIL 2,703 verified diagnoses and counting STUDY Overwatering confirmed as #1 killer across all species NEW Snake plant rot rescue protocol updated DATA 20,000+ raw cases analyzed across 216 species
Alocasia — care guide and common problems
Alocasia

alocasia

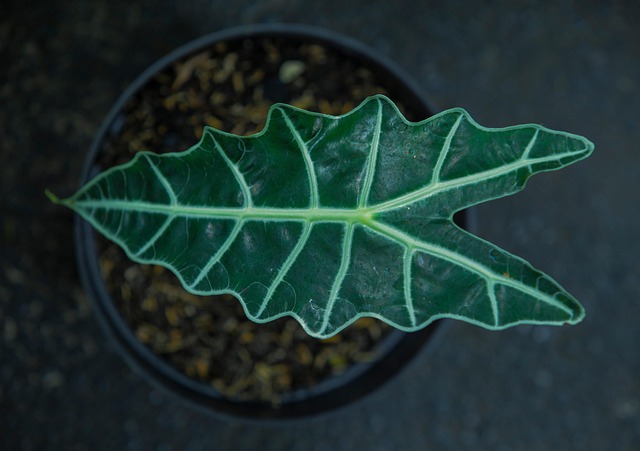
Alocasia spp.

Also known as: Elephant Ear

Evidence-based care guide for Alocasia (Alocasia spp.). Covers symptom diagnosis, disease treatment, pest control, propagation methods, watering and care. Our analysis draws from 43 verified community cases with an average confidence score of 90%. Each protocol is synthesized from real rescue outcomes, not generic advice.

43 diagnoses
Avg. confidence 90%

Care Essentials

Get to Know Your Alocasia

The #1 killer? Overwatering. Let the soil dry between waterings and your Alocasia will thrive.

Light

medium to bright indirect

Tolerates lower light but grows best in medium to bright indirect light. Can get leggy without enough light.

💡 Grow lights: Thrives under artificial grow lights (LED or fluorescent, 10-12 hours/day). A great option if your space lacks natural light.

Watering

every 10-14 days

Let the soil dry out significantly between waterings — this plant is very sensitive to overwatering. When in doubt, wait another day.

Humidity & Temperature

Loves higher humidity (60%+). If your air is dry, group it with other plants, use a pebble tray, or run a humidifier nearby.

Sensitive to cold — keep above 55°F (13°C). Avoid placing near drafty windows or exterior doors in winter.

Soil

Needs well-draining soil — add perlite or orchid bark to a standard potting mix. Good drainage is critical to prevent root rot.

⚠️ May be toxic to pets. Keep out of reach of cats, dogs, and small children.
Difficulty intermediate

Care Requirements

At a Glance

Care Profile in Development

While our detailed care profile is being compiled, you can find specific care guidance in the 4 care-related diagnoses below — including watering schedules, light requirements, and propagation methods from real-world cases.

Start Here

Most Common Problems

Based on 43 analyzed cases — these are the issues you're most likely to encounter

Don't see your symptom? Search all 33 topics below, or run the Diagnostic.

Free Diagnostic

Which of the 7 killers is threatening your plants? Take the 60-second quiz — we'll tell you exactly.

60 seconds · Free

Which of the 7 Killers
is threatening your plants?

We analyzed 1,616 documented plant deaths to identify the 7 causes behind 78% of all losses. Answer 5 questions — we'll tell you exactly which ones apply to your setup.

Skip the quiz — get The 7 Killers course ($19) →

Question 1 of 5

How do you decide when to water your plants?

Question 2 of 5

Where do most of your plants live?

Question 3 of 5

What's your home environment like?

Question 4 of 5

Have you lost a plant in the last 6 months?

Question 5 of 5

How often do you check your plants for pests?

🔬

Your diagnosis is ready

We've identified your top 2 risk killers. Enter your email to see the full breakdown and your personalized rescue protocol.

No spam. One-click unsubscribe anytime.

Your Plant Mortality Diagnosis

Your plants are most at risk from:

The 7 Killers: What 1,616 Dead Houseplants Taught Us — $19 mini-course

The 7 Killers mini-course covers every one of these in depth — mechanism, rescue protocol, prevention. 1,616 cases. 7 lessons. $19.

Get The 7 Killers — $19 →

Read the full mortality report (free) →

Get the Plant Mortality Checklist

The 7 killers behind 78% of houseplant deaths — and the exact fix for each. Free PDF based on 1,616 documented cases.

Free. No spam. Unsubscribe anytime.

Verified Data

All Diagnoses

33 topics consolidated from 43 documented cases. Expand any topic to see all protocols.

Symptoms (2 topics · 2 cases)

What are these brown spots on my Alocasia?

Brown spots on Alocasia have several potential causes requiring careful diagnosis: (1) Spider mites - look for fine webbing and stippled pattern on leaf undersides, often with yellow halo around spots

90%
Cause

Brown spots on Alocasia have several potential causes requiring careful diagnosis: (1) Spider mites - look for fine webbing and stippled pattern on leaf undersides, often with yellow halo around spots. (2) Rust fungus - orange-brown spots common in high humidity with poor air circulation, typically on leaf surfaces. (3) Bacterial leaf spot - water-soaked angular spots that may ooze, often from water sitting on leaves. (4) Physical damage - healed scars from shipping or handling that appear as brown patches with defined edges. (5) Root rot progression - spots starting at leaf base and spreading upward. (6) Natural senescence - oldest leaf developing spots as it dies back to feed new growth. (7) Mineral buildup from hard water or misting - crusty brown deposits.

Solutions
  • Identify the cause: Check leaf undersides for mites/webbing, inspect spot patterns, review recent care (watering method, humidity levels)
  • For spider mites: Isolate plant, wipe leaves with alcohol/water mix or insecticidal soap, increase humidity to deter mites
  • For rust fungus: Remove infected leaves, improve air circulation with fan, apply copper fungicide, reduce humidity slightly
  • For bacterial spot: Remove affected leaves, avoid wetting foliage when watering, ensure good air circulation
  • For physical damage: No treatment needed - spots are cosmetic and will not spread
  • For root rot: Check roots and repot if mushy, adjust watering schedule
  • For senescence: Allow natural process to complete, remove leaf when fully crispy
  • For mineral buildup: Wipe leaves with distilled water, switch to filtered water or rainwater
Prevention

Maintain 60-80% humidity with good air circulation. Water at soil level avoiding leaf splash. Use filtered water. Inspect new plants thoroughly before introducing to collection. Quarantine plants showing spots. Regular pest checks on leaf undersides. Use appropriate potting mix to prevent root rot.

Why are my Alocasia leaves turning yellow?

Yellow leaves on Alocasia can indicate several different issues: (1) Natural senescence - oldest leaf yellows as new growth emerges; Alocasias typically maintain only 3-4 leaves and recycle nutrients from old to new

91%
Cause

Yellow leaves on Alocasia can indicate several different issues: (1) Natural senescence - oldest leaf yellows as new growth emerges; Alocasias typically maintain only 3-4 leaves and recycle nutrients from old to new. (2) Overwatering/root rot - most common cause; dense soil or lack of drainage causes oxygen deprivation, yellowing from bottom up. (3) Underwatering - leaves yellow and crisp from edges inward. (4) Nutrient deficiency - pale new growth indicates lack of nitrogen or micronutrients; Alocasias are heavy feeders. (5) Pest damage - spider mites or mealybugs cause stippled yellowing. (6) Flowering - plants may sacrifice older leaves when producing flowers. (7) Self-watering pots with dense soil - creates waterlogged lower roots while top appears dry.

Solutions
  • Identify pattern: Single oldest leaf yellowing with healthy new growth = natural senescence. Multiple leaves or new growth yellowing = problem
  • For natural senescence: Leave leaf until fully withered to allow nutrient reabsorption, then remove
  • For overwatering: Check soil with moisture meter or wooden skewer to bottom of pot. Repot into well-draining mix (bark, perlite, coco coir). Use pots with drainage holes
  • For nutrient deficiency: Apply diluted balanced fertilizer (20-20-20 at 1/4 strength) every 2-4 weeks during growing season
  • For pests: Inspect leaf undersides; treat with neem oil, insecticidal soap, or alcohol/water mix
  • For self-watering pots: Empty reservoir and switch to manual watering; these often fail with dense soil mixes
  • Check roots if yellowing spreads: Look for black/mushy roots indicating rot; trim and repot if found
Prevention

Use chunky, well-draining aroid soil mix (not standard potting soil). Ensure pots have drainage holes. Water only when top 2-3 inches of soil are dry. Fertilize regularly during active growth. Maintain 60-80% humidity. Inspect regularly for pests. Understand natural leaf cycling to avoid panic.

Diseases (1 topics · 2 cases)

Why does my Alocasia have root rot?

Alocasia corms (bulbous storage organs) can survive extreme root loss and regenerate through adventitious root formation, unlike fibrous-rooted plants

2 protocols 91–92%

Protocol 1: root rot · 92% confidence

Cause

Alocasia corms (bulbous storage organs) can survive extreme root loss and regenerate through adventitious root formation, unlike fibrous-rooted plants. When root rot occurs, the corm stores sufficient carbohydrates and meristematic tissue to initiate new root primordia within 2-4 weeks under optimal conditions. This 'zombie' regeneration capability explains why Alocasias recover from 90% root loss that would kill other houseplants.

Solutions
  • Remove all soil and gently rinse corm under lukewarm water to assess damage
  • Trim any soft, mushy, or foul-smelling corm tissue with sterile scissors until only firm, white/pale tissue remains
  • Apply cinnamon powder or diluted hydrogen peroxide (3% at 1:1 with water) to cut surfaces to prevent reinfection
  • Place corm in moist perlite filled 2/3 up in clear container, or water propagate with tip above waterline
  • Maintain 70-85°F temperature, 70-90% humidity, and bright indirect light; expect new white root tips in 2-4 weeks
  • Repot in aroid mix only when roots reach 1-2 inches long, keeping corm partially exposed at soil surface
Prevention

Maintain corm health by using chunky, well-draining aroid mix (40% bark, 30% perlite, 30% potting soil); water only when top 2 inches dry; ensure bright indirect light to support corm metabolism; inspect corms monthly by gently unpotting to check for firmness (healthy corms feel like firm potatoes).

Protocol 2: root rot · 91% confidence

Cause

Root rot in Alocasia is primarily caused by chronic overwatering in dense or poorly draining soil, often combined with lack of drainage holes in pots. Other triggers include: using self-watering pots with standard potting soil, watering too frequently in low light or cold conditions, and transplanting without established root systems. What looks like root rot may also be normal root adaptation when switching growing mediums (soil roots dying as water roots form). True rot shows black, mushy roots with foul odor; healthy roots remain firm and white or tan. Alocasias can recover from severe root loss because they store energy in their corms.

Solutions
  • Assess severity: Healthy roots are firm and white/tan; rotting roots are black, mushy, and smell foul. Some brown roots may just be adapting to new medium
  • Remove rot: Trim all mushy, black roots with sterilized scissors. If corm is affected, cut until you reach healthy white tissue
  • Water propagation: Place cleaned corm in filtered water (just covering base, not fully submerged), changing water daily to prevent bacterial growth
  • Alternative methods: Propagate in moist perlite or sphagnum moss in a closed container with air vents, maintaining 70-80% humidity
  • Recovery monitoring: Wait for new white roots to emerge (2-6 weeks). Once roots are 1-2 inches long, transition to well-draining soil
  • Prevent rot recurrence: Use terracotta pots with drainage holes, chunky aroid mix (bark, perlite, coco coir), and water only when top 2-3 inches of soil are dry
Prevention

Always use pots with drainage holes. Create well-draining aroid soil mix (50% potting soil, 30% perlite/bark, 20% coco coir). Water based on soil dryness, not schedule - use moisture meter or wooden skewer method. Avoid self-watering pots unless using LECA/semi-hydro. Maintain 60-80% humidity via humidifier or pebble tray (not misting). Repot nursery plants immediately as they often come in water-retentive soil.

Pests (4 topics · 7 cases)

What pests are on my Alocasia?

Severe thrips or spider mite infestations often cause total defoliation of Alocasia as the plant enters protective dormancy to conserve corm energy

88%
Cause

Severe thrips or spider mite infestations often cause total defoliation of Alocasia as the plant enters protective dormancy to conserve corm energy. Unlike root rot which destroys the corm itself, pest-induced defoliation preserves the underground storage organ. The corm contains dormant meristematic tissue capable of producing new growth when conditions improve. Premature disposal of 'leafless' Alocasias discards viable plants capable of full recovery.

Solutions
  • Inspect corm health: Firm, white-to-cream colored corm indicates viability; mushy brown corm indicates secondary rot
  • Selective pruning: Remove all dead leaves but preserve central stem if firm and green
  • Post-treatment care: Provide bright indirect light (2000-4000 lux), 70-80% humidity, 70-85°F temps
  • Water sparingly: Keep soil lightly moist—not wet—until new growth emerges
  • Recovery timeline: Expect 4-8 weeks for first new leaf; full canopy in 3-4 months under optimal conditions
Prevention

Maintain vigilance 4 weeks post-treatment when plant is vulnerable; avoid fertilizing until 3 new leaves emerge; ensure adequate humidity prevents mite reinfestation during recovery; isolate recovering plants until 2 weeks after full leaf emergence

Why does my Alocasia have spider mites?

Applying Imidacloprid-based systemic granules to treat pests, which inadvertently increases spider mite reproduction rates

2 protocols 89–99%

Protocol 1: spider mites · 99% confidence

Cause

Applying Imidacloprid-based systemic granules to treat pests, which inadvertently increases spider mite reproduction rates.

Solutions
  • Stop using Imidacloprid (Bonide) if spider mites are the primary pest or are present alongside thrips.
  • Research shows Imidacloprid increases female spider mite fecundity (egg-laying).
  • Switch to a dedicated miticide (like Spinosad, though technically a broad-spectrum, or specific acaricides), or use predatory mites (Phytoseiulus persimilis).
  • Thoroughly shower the foliage to physically knock down the mite population.
Prevention

Properly identify the pest before applying systemic treatments; systemics are for insects, not arachnids (mites).

Protocol 2: spider mites · 89% confidence

Cause

Spider mites (Tetranychus urticae) thrive in low-humidity conditions (<50% RH) common in heated homes, exploiting the mismatch between Alocasia's tropical native environment and indoor culture. Mites pierce leaf cells to feed, causing stippling that appears as pale dots on dark velvet leaves. Rapid reproduction (eggs hatch in 3 days) allows population explosions within 7-10 days of initial infestation.

Solutions
  • Mix spray: 1/3 isopropyl alcohol + 2/3 water + drop of mild soap; apply to undersides with soft makeup brush
  • Shower plant thoroughly to dislodge webs and mites before chemical treatment
  • Repeat treatment every 5-7 days for 3 cycles to interrupt egg-to-adult lifecycle
  • Boost humidity to 60-70% immediately post-treatment using humidifier or pebble tray
  • Inspect with 10x loupe weekly for 4 weeks; re-treat at first sign of recurrence
Prevention

Maintain 60-80% humidity year-round; mist leaves daily in dry seasons; quarantine new plants 2 weeks; inspect undersides weekly with magnification; avoid placing near heating vents or AC units

Why does my Alocasia have thrips?

Risk of severe toxicity to cats and dogs if they ingest soil or water runoff containing dissolved systemic insecticides

3 protocols 86–95%

Protocol 1: thrips · 95% confidence

Cause

Risk of severe toxicity to cats and dogs if they ingest soil or water runoff containing dissolved systemic insecticides.

Solutions
  • Apply systemic granules ONLY to plants kept in inaccessible rooms or high shelves out of reach of pets.
  • When watering, ensure the drainage water (runoff) in the saucer is immediately discarded and the saucer wiped clean.
  • Cover the topsoil with a layer of heavy decorative stones or a physical mesh barrier to prevent pets from digging.
  • If ingestion is suspected, contact an emergency vet immediately and specify the active ingredient (e.g., Imidacloprid).
Prevention

For households with highly curious pets, opt for beneficial insects (nematodes/mites) or horticultural oils instead of chemical systemics.

Protocol 2: thrips lifecycle · 88% confidence

Cause

Thrips insert eggs directly into Alocasia leaf tissue using saw-like ovipositors, depositing them inside veins and between epidermal layers. This endophytic oviposition protects eggs from topical sprays and wiping treatments. A single female lays 50-100 eggs in her lifetime, with eggs hatching in 3-5 days. Surface treatments only kill exposed adults, leaving protected eggs to repopulate the plant within one week.

Solutions
  • Prune heavily damaged leaves at base to remove egg-laden tissue
  • Apply soil drench with systemic insecticide 7 days after foliar treatment to kill pupating larvae in soil
  • Rotate chemical classes: use spinosad, then insecticidal soap, then neem to prevent resistance
  • Introduce beneficial nematodes (Steinernema feltiae) to soil to parasitize pupating thrips
  • Maintain 4-week treatment cycle even after visible thrips disappear to eliminate hatched eggs
Prevention

Prophylactic systemic soil treatment for high-value Alocasias during spring growth surge; weekly inspections with 10x magnification to catch adults before oviposition begins; maintain high humidity (>60%) which reduces thrips reproductive rates

Protocol 3: thrips early detection · 86% confidence

Cause

Thrips feeding on Alocasia leaves produces distinctive black fecal pellets (frass) that accumulate on leaf surfaces, particularly along veins and at the base of the petiole. Unlike dust or soil splatter, thrips frass adheres firmly to the waxy cuticle and appears as tiny, irregular black specks resembling coarse pepper. On dark velvet Alocasia leaves, these specks contrast visibly and serve as the earliest detectable sign of infestation—often appearing 1-2 weeks before visible stippling damage or live insects.

Solutions
  • Inspect weekly with bright LED light held at 45° angle to create shadows that highlight frass particles
  • Distinguish frass from soil: frass adheres when rubbed; soil dust wipes away easily
  • Check leaf bases and undersides first—thrips prefer tender new growth and protected undersides
  • Target treatment to frass-heavy areas before visible insects appear
  • Photograph suspected frass with phone macro lens for documentation and comparison
Prevention

Establish weekly frass-check routine during spring/summer when thrips are most active; quarantine all new plants and inspect for frass before introducing to collection; maintain high humidity (60%+) which reduces thrips feeding activity and frass production

What pests are on my Alocasia?

Alocasia's textured velvet leaves create microhabitats that simultaneously harbor both thrips and spider mites

86%
Cause

Alocasia's textured velvet leaves create microhabitats that simultaneously harbor both thrips and spider mites. The dense trichome layer traps humidity pockets favorable to mites while leaf folds provide thrips shelter. Co-infestation occurs when one pest weakens the plant, reducing defensive compounds and making tissue more susceptible to secondary invaders. Combined feeding damage creates compounding stress that triggers dormancy or death.

Solutions
  • Treat both pests simultaneously: mites respond to alcohol-soap spray, thrips require systemic approach
  • Prune all damaged foliage before treatment to reduce pest load and improve spray penetration
  • Apply miticide-alcohol spray first (targets mites), wait 48 hours, then apply systemic soil drench (targets thrips)
  • Isolate plant for 6 weeks minimum—longer than single-pest quarantine due to overlapping lifecycles
  • Maintain 70%+ humidity post-treatment: discourages mites while thrips treatment continues via systemics
Prevention

Inspect new acquisitions with 10x loupe for BOTH pest types—look for thrips frass (black specks) AND mite stippling; maintain stable 65-75% humidity with good airflow to prevent mite-favorable dry pockets while keeping thrips populations down

Watering Issues (2 topics · 2 cases)

Is my Alocasia overwatered?

Overwatering in Alocasia is fundamentally about watering frequency, not volume

90%
Cause

Overwatering in Alocasia is fundamentally about watering frequency, not volume. These tropical aroids require oxygen exchange at their fibrous roots between waterings. When watered too frequently (before top 2 inches dry), soil remains saturated, creating anaerobic conditions where oxygen levels drop below 2mg/L. This suffocates roots and promotes anaerobic bacterial growth (Pythium, Erwinia) that breaks down root tissue. The plant's dramatic leaf droop often leads owners to water MORE, accelerating the rot cycle.

Solutions
  • Confirm diagnosis: Insert finger 2 inches deep—moist/wet soil with drooping leaves = overwatering; dry soil = underwatering
  • Stop all watering immediately; remove from cache pot to improve drainage
  • Unpot and inspect roots—trim all mushy, black, foul-smelling roots with sterile scissors
  • If roots are severely compromised (>50% loss), follow corm regeneration protocol
  • Repot in fresh dry aroid mix; wait 7 days before first watering to allow roots to recover
  • Resume watering only when soil is completely dry; expect 4-6 week recovery before new growth emerges
Prevention

Use finger test or moisture meter: Water only when top 2 inches (5cm) of soil are completely dry to touch; in winter or low light, extend interval to 10-14 days; use well-draining aroid mix (40% bark, 30% perlite); ensure pots have drainage holes; avoid decorative cache pots without drainage.

How often should I water my Alocasia?

Alocasias require consistently moist (not wet) soil due to their tropical understory origins, but are highly sensitive to waterlogged conditions which cause anaerobic root rot

88%
Cause

Alocasias require consistently moist (not wet) soil due to their tropical understory origins, but are highly sensitive to waterlogged conditions which cause anaerobic root rot. The critical failure mode is soil staying saturated for >7 days, not the volume of water given. Self-watering pots and dense soil mixes trap moisture at the root zone, leading to oxygen deprivation and bacterial rot.

Solutions
  • Check soil moisture with finger 2-3 inches deep; water only when top layer is dry but lower soil remains slightly moist
  • Use chunky, well-draining aroid mix: 50% bark/chunky perlite, 30% peat/coco coir, 20% pumice or sphagnum
  • Water thoroughly until drainage flows, then empty saucer immediately—never let pot sit in standing water
  • Switch to bottom watering for precise control: submerge pot in basin until top soil dampens, then drain
  • In winter, extend intervals to every 2-3 weeks as evaporation slows
Prevention

Use terra cotta or nursery pots with drainage holes; avoid decorative pots without drainage. Never use self-watering features for soil-grown Alocasias. Maintain bright indirect light and 60%+ humidity to balance transpiration with soil moisture.

Environment (2 topics · 3 cases)

Is my Alocasia suffering from cold damage?

Alocasias are strictly tropical plants with minimal cold tolerance

90%
Cause

Alocasias are strictly tropical plants with minimal cold tolerance. Critical threshold is 50�F (10�C) - below this, cellular damage begins. At 32�F (0�C), ice crystals form in leaf cells causing irreversible rupture. Common cold stress scenarios: brief outdoor exposure during transport (even 2 minutes), proximity to drafty windows in winter, AC vents blowing cold air, or moving during cold seasons. Cold-damaged leaves show: wilting, browning/crispy texture, dark spots, or melting appearance. Stems may remain standing while leaves collapse. Unlike root rot, cold damage affects foliage first.

Solutions
  • Assess damage: Cold-damaged leaves will turn brown and crispy but may contain carbohydrate reserves. Do not remove until completely dried
  • Provide warmth immediately: Move to stable 65-80�F environment, away from drafts and windows
  • Maintain humidity: Cold-stressed plants need 60-80% humidity to prevent further desiccation
  • Avoid overwatering: Damaged roots absorb less water; let soil dry more between waterings
  • Wait patiently: Recovery can take weeks to months. New growth from the corm indicates successful recovery. This may not appear until spring/summer
  • Do not fertilize: Wait until active new growth appears before feeding
  • Inspect for secondary issues: Cold-stressed plants are more susceptible to pests and rot - monitor closely
Prevention

Never expose Alocasias to temperatures below 50�F. Use insulated transport (boxes, blankets) when moving plants in cold weather. Keep away from drafty windows, doors, and AC vents in summer. Maintain stable indoor temperatures year-round (65-80�F ideal). Research variety-specific needs - jewel Alocasias are particularly cold-sensitive. Consider heating mats for winter in cold climates.

Does my Alocasia need more humidity?

Alocasias are tropical understory plants native to humid Southeast Asian environments (60-95% RH typical)

2 protocols 90–90%

Protocol 1: humidity requirements · 90% confidence

Cause

Alocasias are tropical understory plants native to humid Southeast Asian environments (60-95% RH typical). Indoor air, especially in winter with heating or in arid climates, often falls to 20-40% RH, causing: leaf tip browning, crispy edges, stunted new growth, increased spider mite susceptibility, and melting or distorted unfurling leaves. However, some varieties (like Baginda/Dragon Scale) are more tolerant of moderate humidity (45-60%) than commonly believed. The key is consistency - fluctuations between high and low humidity are more stressful than steady moderate levels.

Solutions
  • Assess current humidity: Use a hygrometer ($10-15) placed near the plant to establish baseline
  • Increase humidity gradually: Target 60-80% RH for most Alocasia varieties
  • Pebble trays: Fill shallow tray with pebbles and water; place pot on top (not sitting in water). Increases local humidity 10-15%
  • Humidifiers: Cool mist humidifier positioned nearby is most effective. Run during heating season and dry periods
  • Grouping plants: Cluster Alocasias with other tropicals to create humidity microclimate
  • Terrariums/cloches: Clear plastic boxes or propagation domes work excellently for small Alocasias or recovering plants. Air out daily to prevent mold
  • Avoid misting: While common advice, misting provides only temporary relief and can cause leaf spot or fungal issues if water sits on leaves
  • Monitor and adjust: If leaves still crisp at 60% RH, increase further. If no issues at 45% RH, your variety may be tolerant
Prevention

Maintain consistent humidity year-round using automated humidifiers with built-in hygrometers. Group tropical plants together. Use pebble trays as backup. Monitor with hygrometer, not guesswork. Research specific variety needs - jewel Alocasias need higher humidity (70%+) than larger varieties like Odora.

Protocol 2: humidity · 90% confidence

Cause

Alocasia species are native to tropical understory environments with 60-80% relative humidity. When indoor humidity drops below 50%, leaves lose turgor through excessive transpiration, causing marginal necrosis (crispy brown edges), yellowing, and stunted growth. Unlike overwatering (which causes root rot with soft, mushy tissue), low humidity damage presents as dry, crispy leaf margins without soil saturation.

Solutions
  • Measure ambient humidity with a hygrometer; maintain 60-80% RH for optimal growth
  • Use a humidifier set to run continuously or place plant on a large pebble tray (16" diameter) filled with water and LECA for passive evaporation (~10% RH boost)
  • Group 5-7 Alocasia plants closely to create a microclimate through transpiration synergy
  • Mist leaves only as temporary relief—does not replace sustained humidity
  • Move to bathroom or kitchen if natural humidity is higher in those spaces
Prevention

Maintain year-round 60%+ humidity via automated humidifiers or consistent pebble trays; avoid placement near heating/cooling vents or drafty windows. Humidity needs are non-negotiable for jewel varieties and Alocasia 'Black Velvet' which will enter dormancy below 60% RH.

Propagation (1 topics · 3 cases)

How do I propagate my Alocasia?

User misinterprets normal Alocasia behaviors—yellow cracks from new leaf unfurling and senescence on older leaves—as disease or damage, compounded by under-watered, poorly draining soil post-dormancy, with potential misting exacerbating fungal risk; no major conflicts in advice, but newbie overlooks heavy-feeding needs and watering paradox (moist yet well-draining)

3 protocols 86–90%

Protocol 1: sphagnum moss propagation · 90% confidence

Cause

User misinterprets normal Alocasia behaviors—yellow cracks from new leaf unfurling and senescence on older leaves—as disease or damage, compounded by under-watered, poorly draining soil post-dormancy, with potential misting exacerbating fungal risk; no major conflicts in advice, but newbie overlooks heavy-feeding needs and watering paradox (moist yet well-draining).

Solutions
  • Stop misting immediately to prevent fungal issues; wipe leaves every other month for dust removal.
  • Repot into a nursery pot with drainage holes, placed inside decorative pot for easy sink soaking.
  • Water thoroughly to moisten soil fully, allowing excess to drain; check soil dryness before next watering.
  • Monitor leaf count: if losing more than gaining in spring/summer, fertilize 2/3 of waterings as heavy feeder.
  • Observe post-repot for recovery, avoiding changes during adjustment period.
Prevention

Use well-draining soil mix in pots with holes; maintain consistent moist-but-not-soggy soil via weigh-the-pot method; fertilize balanced NPK during active growth (spring-fall); track dormancy cycles to reduce watering/feeding in winter; ensure bright indirect light and 60-70% humidity without misting (pebble tray instead).

Protocol 2: corm propagation methods · 88% confidence

Cause

Alocasia root rot recovery success depends heavily on propagation medium selection. Water propagation provides optimal oxygenation for new root formation but requires frequent changes to prevent bacterial growth. Perlite propagation maintains consistent moisture while providing aeration. Sphagnum moss offers excellent humidity retention but can harbor pathogens if not sterile. The wrong medium choice can cause recovery failure even with healthy corms.

Solutions
  • Water propagation: Use clear glass container, change water every 2-3 days with room-temperature dechlorinated water, keep corm tip above waterline with roots submerged
  • Perlite propagation: Fill clear container 2/3 with moistened perlite (damp but not soggy), place corm with cut side down, cover with plastic bag for humidity leaving small air gap
  • Sphagnum moss: Use only new, sterile long-fiber sphagnum, wring out until damp but not dripping, place corm in small enclosed container with ventilation holes
  • Temperature: Maintain all methods at 70-80°F with bright indirect light; avoid direct sun that overheats propagation containers
  • Timeline: Expect first white root tips in 1-3 weeks; transplant to soil when roots reach 1-2 inches with multiple branches
Prevention

Select propagation medium based on environment: water for high-humidity homes with time for frequent changes; perlite for drier environments or busy schedules; sphagnum only if using sterile, new moss and maintaining high humidity around the container.

Protocol 3: corm pup propagation · 86% confidence

Cause

Alocasias produce corm offsets (pups) at the base of parent plants as a survival strategy. These corms can be separated and propagated independently, creating backup plants if the parent succumbs to rot or dormancy. However, premature separation or incorrect propagation technique causes pup death. Understanding corm development stages ensures successful multiplication of your Alocasia collection.

Solutions
  • Identification: Look for small bulbous growths (0.5-1 inch diameter) at base of parent plant, often wrapped in papery brown tunic
  • Separation timing: Best done during active growing season (spring/summer); avoid winter when parent may be stressed
  • Gentle removal: Unpot parent, carefully tease away soil from corm base, identify pup attachment point, use sterile blade to separate if necessary
  • Pup preparation: Remove outer brown papery layers to expose pale inner tissue; do NOT remove all roots attached to pup
  • Propagation: Plant individual pup in small 2-3 inch pot with moist aroid mix, keeping top of corm exposed; enclose in humidity dome for 2-3 weeks
  • Care: Keep soil lightly moist, provide bright indirect light, maintain 70-80% humidity until new growth emerges (3-6 weeks)
Prevention

Allow corms to develop on parent plant until they have 2-3 roots of their own; only separate when parent plant is healthy and actively growing; maintain high humidity (70%+) during separation to prevent desiccation of young corms.

Care Methods (4 topics · 6 cases)

General Care: Alocasia Guide

Alocasia failure most commonly stems from the 'humidity-drainage paradox'—plants need high ambient humidity (60%+) but cannot tolerate waterlogged roots

89%
Cause

Alocasia failure most commonly stems from the 'humidity-drainage paradox'—plants need high ambient humidity (60%+) but cannot tolerate waterlogged roots. Standard potting soils and self-watering pots create the opposite conditions: low humidity around leaves and saturated soil at roots. Success requires balancing these competing needs with proper soil composition and environmental control.

Solutions
  • Light: Bright indirect light (2000-5000 lux); east or north-facing windows ideal; avoid harsh afternoon sun
  • Soil: Chunky aroid mix—equal parts coco coir, perlite, and quality potting soil (e.g., Fox Farms Ocean Forest)
  • Water: Thoroughly moisten when top 2 inches dry; never let sit in standing water; bottom-water for precision
  • Humidity: 60-80% via humidifier or large pebble trays; misting insufficient alone
  • Temperature: 65-85°F; protect from cold drafts and AC vents; stable warmth prevents dormancy
  • Fertilizer: Balanced liquid at 1/4 strength every 2 weeks during active growth (spring-fall)
Prevention

Quarantine new plants for 2 weeks to acclimate; repot from nursery soil into chunky aroid mix within first month; establish automated humidifier and grow light schedules for year-round consistency.

Hydrogen Peroxide Drench: How to Use for Alocasia

User misinterprets normal Alocasia behaviors—yellow cracks from new leaf unfurling and senescence on older leaves—as disease or damage, compounded by under-watered, poorly draining soil post-dormancy, with potential misting exacerbating fungal risk; no major conflicts in advice, but newbie overlooks heavy-feeding needs and watering paradox (moist yet well-draining)

2 protocols 89–90%

Protocol 1: hydrogen peroxide drench · 90% confidence

Cause

User misinterprets normal Alocasia behaviors—yellow cracks from new leaf unfurling and senescence on older leaves—as disease or damage, compounded by under-watered, poorly draining soil post-dormancy, with potential misting exacerbating fungal risk; no major conflicts in advice, but newbie overlooks heavy-feeding needs and watering paradox (moist yet well-draining).

Solutions
  • Stop misting immediately to prevent fungal issues; wipe leaves every other month for dust removal.
  • Repot into a nursery pot with drainage holes, placed inside decorative pot for easy sink soaking.
  • Water thoroughly to moisten soil fully, allowing excess to drain; check soil dryness before next watering.
  • Monitor leaf count: if losing more than gaining in spring/summer, fertilize 2/3 of waterings as heavy feeder.
  • Observe post-repot for recovery, avoiding changes during adjustment period.
Prevention

Use well-draining soil mix in pots with holes; maintain consistent moist-but-not-soggy soil via weigh-the-pot method; fertilize balanced NPK during active growth (spring-fall); track dormancy cycles to reduce watering/feeding in winter; ensure bright indirect light and 60-70% humidity without misting (pebble tray instead).

Protocol 2: hydrogen peroxide root treatment · 89% confidence

Cause

Hydrogen peroxide (H2O2) is an effective emergency treatment for Alocasia root rot when used correctly. The 3% solution available at pharmacies provides immediate oxygenation to suffocated roots while killing anaerobic bacteria. However, improper concentration or application causes root tissue damage. The oxygen release (bubbling action) creates a hostile environment for rot-causing pathogens while providing emergency oxygen to struggling root systems.

Solutions
  • Mix solution: Combine 3% hydrogen peroxide with water at 1:1 ratio (equal parts H2O2 and room-temperature water)
  • Root soak: Submerge cleaned, trimmed roots in solution for 15-20 minutes—you will see bubbling as oxygen releases
  • Corm treatment: If corm shows early rot (soft spots but not mushy), apply solution directly with cotton swab to affected areas
  • Post-treatment: Allow roots to air dry for 1-2 hours in shade; do NOT rinse after H2O2 treatment
  • Repot immediately: Plant in completely fresh, dry aroid mix; do NOT water for 3-5 days post-treatment
  • Follow-up: Water with H2O2 solution (1 tablespoon per cup of water) for first 2 waterings only to maintain pathogen suppression
Prevention

Use H2O2 only for active rot treatment, not as routine care; always dilute 3% pharmacy solution; never use industrial concentrations; follow with proper repotting in sterile soil to prevent reinfection.

Alocasia: Root Surgery

User misinterprets normal Alocasia behaviors—yellow cracks from new leaf unfurling and senescence on older leaves—as disease or damage, compounded by under-watered, poorly draining soil post-dormancy, with potential misting exacerbating fungal risk; no major conflicts in advice, but newbie overlooks heavy-feeding needs and watering paradox (moist yet well-draining)

2 protocols 90–90%

Protocol 1: root surgery · 90% confidence

Cause

User misinterprets normal Alocasia behaviors—yellow cracks from new leaf unfurling and senescence on older leaves—as disease or damage, compounded by under-watered, poorly draining soil post-dormancy, with potential misting exacerbating fungal risk; no major conflicts in advice, but newbie overlooks heavy-feeding needs and watering paradox (moist yet well-draining).

Solutions
  • Stop misting immediately to prevent fungal issues; wipe leaves every other month for dust removal.
  • Repot into a nursery pot with drainage holes, placed inside decorative pot for easy sink soaking.
  • Water thoroughly to moisten soil fully, allowing excess to drain; check soil dryness before next watering.
  • Monitor leaf count: if losing more than gaining in spring/summer, fertilize 2/3 of waterings as heavy feeder.
  • Observe post-repot for recovery, avoiding changes during adjustment period.
Prevention

Use well-draining soil mix in pots with holes; maintain consistent moist-but-not-soggy soil via weigh-the-pot method; fertilize balanced NPK during active growth (spring-fall); track dormancy cycles to reduce watering/feeding in winter; ensure bright indirect light and 60-70% humidity without misting (pebble tray instead).

Protocol 2: root surgery · 90% confidence

Cause

User misinterprets normal Alocasia behaviors—yellow cracks from new leaf unfurling and senescence on older leaves—as disease or damage, compounded by under-watered, poorly draining soil post-dormancy, with potential misting exacerbating fungal risk; no major conflicts in advice, but newbie overlooks heavy-feeding needs and watering paradox (moist yet well-draining).

Solutions
  • Stop misting immediately to prevent fungal issues; wipe leaves every other month for dust removal.
  • Repot into a nursery pot with drainage holes, placed inside decorative pot for easy sink soaking.
  • Water thoroughly to moisten soil fully, allowing excess to drain; check soil dryness before next watering.
  • Monitor leaf count: if losing more than gaining in spring/summer, fertilize 2/3 of waterings as heavy feeder.
  • Observe post-repot for recovery, avoiding changes during adjustment period.
Prevention

Use well-draining soil mix in pots with holes; maintain consistent moist-but-not-soggy soil via weigh-the-pot method; fertilize balanced NPK during active growth (spring-fall); track dormancy cycles to reduce watering/feeding in winter; ensure bright indirect light and 60-70% humidity without misting (pebble tray instead).

Systemic Granules: How to Use for Alocasia

User misinterprets normal Alocasia behaviors—yellow cracks from new leaf unfurling and senescence on older leaves—as disease or damage, compounded by under-watered, poorly draining soil post-dormancy, with potential misting exacerbating fungal risk; no major conflicts in advice, but newbie overlooks heavy-feeding needs and watering paradox (moist yet well-draining)

90%
Cause

User misinterprets normal Alocasia behaviors—yellow cracks from new leaf unfurling and senescence on older leaves—as disease or damage, compounded by under-watered, poorly draining soil post-dormancy, with potential misting exacerbating fungal risk; no major conflicts in advice, but newbie overlooks heavy-feeding needs and watering paradox (moist yet well-draining).

Solutions
  • Stop misting immediately to prevent fungal issues; wipe leaves every other month for dust removal.
  • Repot into a nursery pot with drainage holes, placed inside decorative pot for easy sink soaking.
  • Water thoroughly to moisten soil fully, allowing excess to drain; check soil dryness before next watering.
  • Monitor leaf count: if losing more than gaining in spring/summer, fertilize 2/3 of waterings as heavy feeder.
  • Observe post-repot for recovery, avoiding changes during adjustment period.
Prevention

Use well-draining soil mix in pots with holes; maintain consistent moist-but-not-soggy soil via weigh-the-pot method; fertilize balanced NPK during active growth (spring-fall); track dormancy cycles to reduce watering/feeding in winter; ensure bright indirect light and 60-70% humidity without misting (pebble tray instead).

Maintenance (1 topics · 1 cases)

How should I fertilize my Alocasia?

Dormant Alocasia tubers have minimal metabolic activity and cannot process nutrients

85%
Cause

Dormant Alocasia tubers have minimal metabolic activity and cannot process nutrients. Premature fertilization creates osmotic stress that burns emerging root hairs and forces the plant to expend energy on nutrient processing before photosynthetic capacity has recovered. The nitrogen buildup can also encourage fungal growth around the vulnerable crown during the critical re-establishment phase.

Solutions
  • Wait until second or third new leaf has fully unfurled and hardened before fertilizing
  • Begin with 1/4 strength balanced liquid fertilizer (10-10-10 NPK) applied to moist soil only
  • Increase to 1/2 strength after 4-6 weeks of active growth
  • Use slow-release granular fertilizer at half recommended rate if preferred
  • Avoid high-nitrogen formulations initially as they promote soft growth vulnerable to pests
Prevention

Resume fertilization only when plant shows sustained growth for 3+ consecutive weeks, indicating complete metabolic recovery from dormancy.

Other Topics (16 topics · 17 cases)

Why is my Alocasia's stem turning black?

Black stems in Alocasia result from bacterial soft rot (primarily Erwinia spp

89%
Cause

Black stems in Alocasia result from bacterial soft rot (primarily Erwinia spp. or Pectobacterium) colonizing the corm crown and lower petiole tissue. This occurs when water pools at the base of stems during chronic overwatering, creating anaerobic conditions ideal for bacterial proliferation. Unlike fungal root rot which starts below soil, bacterial stem rot begins at the soil line where moisture accumulates and spreads downward into the corm.

Solutions
  • Immediate action: Remove plant from soil and inspect stem bases—black, mushy tissue at soil line confirms bacterial rot
  • Sterilize tools with 70% isopropyl alcohol; remove ALL affected stem tissue by cutting well above the blackened area into healthy white tissue
  • Inspect corm integrity: If rot has penetrated corm, follow corm regeneration protocol immediately
  • Treat cut surfaces with cinnamon or hydrogen peroxide; allow to callus 24-48 hours
  • Repot in fresh sterile mix with corm positioned 1/3 above soil line to prevent future water pooling at crown
  • Switch to bottom-watering method to keep stem bases dry
Prevention

Water at soil level only—never pour directly onto corm crown; ensure stem bases remain above soil line with corm partially exposed; use pots with drainage holes and well-draining mix; maintain 60-80% humidity via environmental methods rather than overhead misting that wets stems.

Alocasia: Calcium Oxalate Toxicity

Alocasia species contain insoluble calcium oxalate crystals (raphides) in all plant parts

94%
Cause

Alocasia species contain insoluble calcium oxalate crystals (raphides) in all plant parts. When plant tissue is damaged or ingested, these needle-like crystals penetrate mucous membranes causing immediate irritation, swelling, and potential airway compromise. Ingestion leads to oropharyngeal pain, mucosal erosions, and in severe cases, laryngeal edema that can compromise breathing.

Solutions
  • If skin contact occurs: wash immediately with soap and water
  • If ingested: rinse mouth thoroughly, drink milk or water to dilute
  • Seek emergency medical care if airway symptoms develop (hoarseness, swelling, difficulty breathing)
  • Monitor for 24 hours after ingestion - symptoms may be delayed
  • Document plant species for medical personnel if veterinary or hospital care needed
Prevention

Keep all Alocasia plants out of reach of children and pets. Wear gloves when handling or pruning. Never ingest any part of the plant. Wash hands thoroughly after contact.

Alocasia: Corm Energy Reserves

Alocasia corms possess an energy reserve system that sustains the plant during stress periods including root rot recovery, transplant shock, and dormancy

87%
Cause

Alocasia corms possess an energy reserve system that sustains the plant during stress periods including root rot recovery, transplant shock, and dormancy. The corm stores starch in specialized parenchyma cells that can support the plant for 6-12 weeks without photosynthesis or roots. This survival mechanism explains why Alocasias can recover from severe setbacks that would kill other houseplants, but also why they can appear 'dead' while the corm remains viable.

Solutions
  • Corm assessment: Healthy corms are firm, white to pale pink, and free of soft spots; gently squeeze—it should feel like a firm potato with no give
  • Energy reserve indicators: Even with no leaves and no roots, a firm corm indicates viable energy reserves remain
  • Corm exposure: When repotting, position corm with top 1/3 above soil line to prevent moisture accumulation and allow oxygen access
  • Desiccation prevention: Never allow exposed corm to dry out completely in low humidity; use humidity dome if humidity falls below 50%
  • Recovery support: Do NOT fertilize during recovery—corm has sufficient energy reserves; fertilizing stresses the recovering root system
  • Decision point: If corm becomes soft, mushy, or emits foul odor, energy reserves are compromised—follow corm regeneration protocol immediately
Prevention

Protect corm health as priority #1: avoid overwatering that causes rot; ensure corm has access to oxygen by keeping partially exposed above soil; maintain consistent humidity to prevent corm desiccation; avoid fertilizers that can burn corm tissue during stress.

Why are my Alocasia leaves curling?

Curling leaves on Alocasia indicate several possible stressors: (1) Low humidity - most common cause; leaves curl inward to reduce surface area and conserve moisture when humidity drops below 50%

90%
Cause

Curling leaves on Alocasia indicate several possible stressors: (1) Low humidity - most common cause; leaves curl inward to reduce surface area and conserve moisture when humidity drops below 50%. (2) Underwatering or inconsistent watering - leaves curl when thirsty but may recover after watering (distinguishing feature). (3) New leaf emergence - leaves naturally curl during unfurling and will flatten over days to weeks. (4) Root issues - root rot or rootbound plants show persistent curling that does not recover after watering. (5) Temperature stress - cold drafts or heat stress cause protective curling. (6) Pest damage - spider mites cause stippled curling. (7) Improper potting - buried stems or canvas root bags restricting growth.

Solutions
  • Check soil moisture: If dry, water thoroughly and observe if leaves unfurl within 24-48 hours
  • Assess humidity: Use hygrometer; boost to 60-80% with humidifier, pebble tray, or grouping plants
  • Inspect for new growth: If the curled leaf is newest and unfurling, wait 1-2 weeks naturally
  • Check roots if persistent: Unpot and inspect for rot (mushy/black) or circling roots; trim and repot if needed
  • Check for pests: Examine leaf undersides for mites/webbing; treat with alcohol/water spray if found
  • Evaluate environment: Move away from AC vents, drafts, or heat sources
  • Check potting depth: Ensure stems are not buried below soil line; remove any canvas/nursery bags around roots
Prevention

Maintain consistent 60-80% humidity year-round. Water when top 1-2 inches of soil are dry but do not let fully desiccate. Use well-draining aroid mix. Keep in stable environment away from temperature fluctuations. Inspect roots annually and repot when rootbound. Quarantine new plants and inspect thoroughly.

Alocasia: Dormancy

Alocasias enter facultative dormancy when exposed to temperatures below 60°F (15°C), reduced light hours (<12 hours), or chronic low humidity (<50%)

2 protocols 87–87%

Protocol 1: dormancy · 87% confidence

Cause

Alocasias enter facultative dormancy when exposed to temperatures below 60°F (15°C), reduced light hours (<12 hours), or chronic low humidity (<50%). Unlike true geophytes (Colocasia, Caladium), dormancy is not genetically required—indoor plants can grow year-round with supplemental light and stable warmth. Dormancy manifests as leaf yellowing starting from oldest leaves, complete defoliation, and tuber retreat underground.

Solutions
  • Prevent dormancy: Maintain 70-80°F, provide 12-14 hours of bright indirect light or grow lights, keep humidity 60%+
  • If entering dormancy: Reduce watering to once every 3-4 weeks; move to cool (55-65°F), low-light location
  • Do not remove tuber—plant will re-emerge in spring when warmth and light increase
  • Force out of dormancy: Apply 'heat and humidity' method—increase temperature to 75-85°F with high humidity and consistent moisture
  • Inspect roots if no new growth after 4 weeks of ideal conditions—may indicate rot requiring repotting
Prevention

Install grow lights on timers for winter months (October-March); maintain stable temperatures above 65°F; use humidifiers to prevent stress-induced dormancy triggers.

Protocol 2: dormancy · 87% confidence

Cause

When Alocasia emerge from dormancy, their tuberous root systems are initially dormant and highly susceptible to rot from excess moisture. The tuber requires gradual rehydration to reactivate metabolic pathways. Immediate heavy watering saturates the dormant root zone, creating anaerobic conditions that trigger bacterial rot before new feeder roots can establish.

Solutions
  • Wait for first new shoot emergence before increasing water - this indicates metabolic activity has resumed
  • When shoots appear, water sparingly: moisten top 1 inch of soil only, avoiding tuber saturation
  • Gradually increase water volume over 3-4 weeks as new roots develop
  • Use finger test: water only when top 2 inches dry, even during recovery
  • Avoid bottom-watering initially as it promotes uneven soil saturation around dormant tubers
Prevention

Maintain tuber in barely moist medium during dormancy; resume watering only when soil thermometer reads 65°F+ and new growth points are visible.

Alocasia: Dormancy Cycles Myth

A widespread misconception conflates Alocasia behavior with true tuberous aroids like Colocasia and Caladium, which undergo complete dormancy

90%
Cause

A widespread misconception conflates Alocasia behavior with true tuberous aroids like Colocasia and Caladium, which undergo complete dormancy. Indoor Alocasias do not experience true dormancy—they exhibit stress-induced leaf senescence or growth slowdown when conditions become unfavorable. Cold exposure below 60°F (15°C), sudden drops in humidity, or reduced light triggers tuber signaling that mimics dormancy. However, with stable indoor conditions (70-80°F, 60%+ humidity, bright indirect light), Alocasias can maintain foliage year-round. The confusion leads owners to incorrectly store bulbs or cease watering, causing unnecessary plant death when simple environmental adjustments would suffice.

Solutions
  • Assess true dormancy vs stress: True dormancy involves complete leaf dieback and dry bulb storage; stress-induced slowdown shows gradual yellowing with viable rhizome and potential for recovery
  • Maintain stability: Keep consistent temperatures 70-80°F, humidity 60-80%, and bright indirect light year-round
  • For cold-exposed plants: Gradually warm to 70°F+, increase humidity via humidifier/pebble trays, and provide bright indirect light
  • Watering adjustment: Reduce watering frequency by 30-40% during stress slowdown but never allow complete drying
  • Monitor for recovery: New leaf emergence within 2-4 weeks indicates successful revival from stress state
  • Fertilizer pause: Hold fertilization during stress recovery until active new growth resumes
Prevention

Gradually acclimate nursery plants over 1-2 weeks; avoid winter purchases from cold-stored sources; maintain stable year-round environment with grow lights and humidifiers in winter; quarantine new plants in consistent conditions; never confuse stress-induced leaf drop with true dormancy requiring dry storage.

Alocasia: Dormancy End Identification

Many Alocasia owners mistake dormant tubers for dead plants and discard them prematurely

86%
Cause

Many Alocasia owners mistake dormant tubers for dead plants and discard them prematurely. Dormancy end is not marked by leaf emergence but by subtle physiological changes at the crown. Recognizing these early indicators prevents both premature intervention (disturbing resting tubers) and delayed action (missing the optimal revival window when conditions are right).

Solutions
  • Inspect crown weekly: emergence of pale pink or cream-colored growth point indicates wake cycle has begun
  • Gentle squeeze test: firm, plump tuber that resists pressure indicates viability - discard only if mushy or desiccated
  • Look for subtle crown swelling where new petiole will emerge, appearing 1-2 weeks before visible shoot
  • Roots may begin white tip growth before any above-ground activity - check root health if accessible
  • First new leaf may emerge pale or smaller than mature leaves - this is normal, not a deficiency sign
Prevention

Mark dormancy start date on calendar; healthy Alocasia typically emerge within 8-12 weeks of dormancy onset when conditions remain favorable.

How much light does my Alocasia need?

Alocasia dormancy is primarily triggered by shortening photoperiods below 12 hours daily

88%
Cause

Alocasia dormancy is primarily triggered by shortening photoperiods below 12 hours daily. To break dormancy, the tuber requires increasing day length signals that mimic spring conditions. Premature light increases without corresponding warmth and humidity create photodamage risk to unopened shoots, while insufficient light delays emergence.

Solutions
  • Extend photoperiod to 12-14 hours using LED grow lights positioned 18-24 inches above dormant tuber
  • Begin with 10-12 hours daily and increase by 30 minutes every 3-4 days over 2 weeks
  • Provide 2000-4000 lux intensity initially, increasing to 4000-6000 lux as leaves unfurl
  • East-facing windows with supplemental lighting provide ideal spectrum balance
  • Rotate pot 90° weekly to ensure even light distribution around emerging shoots
Prevention

Install programmable grow lights in autumn to maintain 12+ hour photoperiod year-round, preventing dormancy initiation in indoor specimens.

Alocasia: Dormancy Temperature Warming

Alocasia tubers remain dormant when soil temperatures fall below 60°F (15°C) due to reduced enzymatic activity in the apical meristem

90%
Cause

Alocasia tubers remain dormant when soil temperatures fall below 60°F (15°C) due to reduced enzymatic activity in the apical meristem. Cold soil prevents hormone signaling that initiates cell division for new growth. However, rapid temperature increases above 85°F can shock dormant tissue and cause tuber rot by accelerating metabolic demands before vascular systems can support them.

Solutions
  • Maintain soil temperature at 70-75°F (21-24°C) for optimal emergence - use heat mat with soil probe thermostat
  • Position heat mat under pot, not wrapped around it, to warm root zone from below
  • If without heat mat: place pot on warm water tray (refilled with 75°F water every 2-3 days)
  • Ensure ambient air temperature stays 65-80°F - avoid drafts below 60°F that reverse progress
  • Wrap pot in towel or bubble wrap to insulate and maintain stable soil temperature
Prevention

Avoid exposing Alocasia to temperatures below 65°F during winter to prevent dormancy initiation in indoor specimens.

Alocasia: Incorrect Orientation Or

Alocasia corms failing to sprout due to incorrect orientation or rotting in overly wet substrate

97%
Cause

Alocasia corms failing to sprout due to incorrect orientation or rotting in overly wet substrate.

Solutions
  • Identify the top (pointy end) and bottom (flat/rough end) of the corm. Peel off the dark outer husk gently.
  • Nestle the corm into damp, fluffy sphagnum moss with the top 1/3 exposed to the air and light.
  • Place in a warm environment (75-80°F) under bright, indirect light (like a grow light).
  • Maintain high humidity using a cloche or small clear plastic cup placed over the corm.
Prevention

Never bury Alocasia corms completely in the medium, as this significantly increases rot risk before sprouting.

Why is my Alocasia dropping leaves?

Alocasias are extremely sensitive to shipping stress due to their tropical nature and delicate leaf structure

90%
Cause

Alocasias are extremely sensitive to shipping stress due to their tropical nature and delicate leaf structure. During transit, they experience: desiccation from low humidity, temperature fluctuations, physical damage to unfurling leaves, and ethylene exposure from packaging. This triggers a survival response where the plant sheds leaves to conserve energy for the corm. What appears to be death is often just stress-induced dormancy. The corm remains viable and will resprout if given proper recovery conditions. New leaves emerging immediately after shipping is actually a good sign - it indicates the plant is redirecting stored energy rather than truly dying.

Solutions
  • Assess viability: Check the corm/bulb at the base - firm and white/cream indicates life; mushy and foul-smelling indicates rot
  • Remove shipping stressors: Cut back dead or dying leaves to reduce transpiration burden. Leave stems until fully crispy as they contain reserves
  • Provide recovery environment: Bright indirect light, 70-85�F, 70%+ humidity. Consider a humidity dome or clear plastic bag for the first 1-2 weeks
  • Water carefully: Use room temperature water. Keep soil lightly moist but not soggy. Bottom watering preferred
  • Wait patiently: Recovery can take 2-8 weeks. New growth may emerge from the corm even if all leaves were lost
  • Avoid fertilizing: Wait until new growth is established and actively growing before feeding
  • Quarantine: Keep separated from other plants for 2 weeks to prevent potential pest spread from shipping stress
Prevention

Source from reputable sellers who use heat packs in cold weather and proper packaging. Request plants be shipped without unnecessary soil (bare root) to reduce weight and rot risk. Time orders for moderate weather seasons. Immediately unpack and acclimate upon arrival - do not let sit in box. Research seller reviews specifically mentioning Alocasia shipping success.

Alocasia: Moisture Meter Interpretation

The moisture meter confusion stems from misunderstanding how Alocasia roots interact with soil moisture zones

88%
Cause

The moisture meter confusion stems from misunderstanding how Alocasia roots interact with soil moisture zones. These tropical aroids require the upper soil layers (where fine feeder roots concentrate) to dry while deeper soil maintains slight moisture for anchoring roots. Standard 'moist' meter readings don't account for this stratification, leading to overwatering when the bottom remains wet while surface appears dry.

Solutions
  • Proper technique: Insert moisture meter probe vertically 2-3 inches deep near pot edge (avoiding central root zone); wait 60 seconds for stable reading
  • Target reading: Water when meter shows 3-4 on 10-point scale (upper soil dry, lower still holding moisture)
  • Avoid bottom-only readings: Probe pushed to pot bottom always shows moisture—this causes overwatering
  • Combine methods: Use meter weekly to track trends, but finger test at 2 inches before every watering for final decision
  • Soil mix calibration: Test your specific mix—thoroughly water, check daily with meter to learn how many days until reading reaches your target (typically 7-10 days)
  • Adjustment: Reduce target reading by 1 point in winter when evaporation slows; increase by 1 point in summer/active growth
Prevention

Use moisture meters with probe inserted at 2-3 inch depth—not at bottom of pot; combine meter readings with finger test at surface; choose meters with 1-10 scale rather than simple dry/moist/wet indicators; calibrate to your specific soil mix's drainage rate.

Alocasia: No New Growth

When Alocasia stops producing new growth, investigate: (1) Insufficient light - needs bright indirect light; low light causes dormancy-like stalling

89%
Cause

When Alocasia stops producing new growth, investigate: (1) Insufficient light - needs bright indirect light; low light causes dormancy-like stalling. (2) Nutrient deficiency - Alocasias are heavy feeders and need regular fertilization during growing season. (3) Rootbound - roots fill pot and cannot expand; check for roots growing from drainage holes. (4) Seasonal dormancy - natural slowdown in fall/winter even indoors. (5) Improper soil - dense soil prevents root expansion and oxygen access. (6) Stress - recent repotting, shipping, or environmental changes cause temporary halt. (7) Focus on flowering - plant directs energy to blooms instead of leaves. Small leaves dying while corms form indicates the plant is propagating instead of growing larger.

Solutions
  • Check light levels: Move to brighter indirect light or add grow light (12-14 hours/day)
  • Fertilize: Apply diluted balanced fertilizer (20-20-20 at 1/4 strength) every 2-4 weeks during growing season
  • Inspect roots: If pot-bound (70%+ roots), repot to container 2 inches larger with fresh aroid mix
  • Adjust for season: If winter, reduce watering and wait for spring; maintain humidity and light
  • Check soil quality: Repot into chunky aroid mix (bark, perlite, coco coir) if current soil is dense
  • Wait out stress: If recently moved/repotted, give 2-4 weeks to acclimate
  • Remove flower stalks: If flowering, cut stalks to redirect energy to leaf growth
Prevention

Provide consistent bright indirect light year-round. Fertilize regularly during active growth. Repot annually or when rootbound. Maintain 60-80% humidity. Avoid unnecessary disturbances. Research variety-specific needs - some Alocasias naturally grow slower than others.

Alocasia: Seasonal Dormancy

Alocasia dormancy is frequently misdiagnosed as root rot, and vice versa

91%
Cause

Alocasia dormancy is frequently misdiagnosed as root rot, and vice versa. True dormancy (triggered by temperatures below 60°F/15°C and reduced photoperiod) causes gradual leaf yellowing from oldest leaves, firm corm, and no foul odor. Root rot causes rapid leaf collapse across all ages, soft/mushy corm, and distinct sour/foul smell from anaerobic bacterial infection. The confusion leads to opposite treatments: dormancy requires patience; rot requires immediate intervention.

Solutions
  • Diagnostic check: Gently unpot plant and inspect corm—firm and white/pale = dormancy; soft, mushy, black, foul-smelling = rot
  • Smell test: Healthy corms have earthy aroma; rot produces distinct sour/foul odor from anaerobic bacteria
  • For dormancy: Reduce watering by 50%, maintain humidity 60-80%, keep in bright indirect light; expect regrowth in 4-8 weeks when conditions improve
  • For rot: Immediately follow corm regeneration protocol (see 'Corm Regeneration' entry)
  • Documentation: Photograph corm condition at discovery to track changes during recovery
Prevention

Understand your Alocasia species: tuberous types (amazonica, Polly) enter dormancy below 60°F; rhizomatous types (odora, zebrina) rarely fully defoliate. Maintain stable indoor temperatures above 65°F year-round to prevent dormancy triggers. Monitor for pre-dormancy signals: slowing growth, smaller new leaves.

What is the best soil mix for Alocasia?

Alocasia calidora demonstrates significant phytoremediation capacity for heavy metal contaminated soils when inoculated with arbuscular mycorrhizal fungi (AMF)

91%
Cause

Alocasia calidora demonstrates significant phytoremediation capacity for heavy metal contaminated soils when inoculated with arbuscular mycorrhizal fungi (AMF). Research shows AMF-inoculated plants achieve removal efficiencies of 84.67% for arsenic, 92.26% for nickel, and 92.35% for lead. The symbiotic relationship enhances metal accumulation in both roots and shoots while supporting plant growth and tolerance.

Solutions
  • Add AMF inoculum to potting mix at planting (follow product instructions)
  • Reinoculate every 30-60 days during growing season
  • Maintain soil pH between 6.0-7.0 for optimal AMF activity
  • Avoid over-fertilizing with phosphorus which can inhibit AMF colonization
  • Use organic fertilizers that support soil biology rather than synthetic salts
Prevention

Use AMF-inoculated soil when planting Alocasia in containers. Reapply AMF inoculum every 30-60 days for ongoing benefits. Maintain consistent soil moisture to support mycorrhizal network activity.

Alocasia: Toxic To Dogs

Severe calcium oxalate toxicity

90%
Cause

Severe calcium oxalate toxicity. The large leaves contain needle-like crystals that cause immediate and intense oral pain, drooling, and swelling.

Solutions
  • Rinse the mouth immediately.
  • Offer a small amount of liquid to flush the throat.
  • Monitor closely for airway obstruction; vet intervention is strongly recommended for severe swelling.
Prevention

Floor-standing large Alocasias must be isolated from large dogs prone to chewing.

Further Reading

Related Articles

Common Questions

Frequently Asked Questions

Why does my alocasia have Thrips?

Cause: Risk of severe toxicity to cats and dogs if they ingest soil or water runoff containing dissolved systemic insecticides.

Solution: Apply systemic granules ONLY to plants kept in inaccessible rooms or high shelves out of reach of pets.

Prevention: For households with highly curious pets, opt for beneficial insects (nematodes/mites) or horticultural oils instead of chemical systemics.

95% confidence · View full protocol →

Why does my alocasia have Sphagnum moss propagation?

Cause: User misinterprets normal Alocasia behaviors—yellow cracks from new leaf unfurling and senescence on older leaves—as disease or damage, compounded by under-watered, poorly draining soil post-dormancy, with potential misting exacerbating fungal risk; no major conflicts in advice, but newbie overlooks heavy-feeding needs and watering paradox (moist yet well-draining).

Solution: Stop misting immediately to prevent fungal issues; wipe leaves every other month for dust removal.

Prevention: Use well-draining soil mix in pots with holes; maintain consistent moist-but-not-soggy soil via weigh-the-pot method; fertilize balanced NPK during active growth (spring-fall); track dormancy cycles to reduce watering/feeding in winter; ensure bright indirect light and 60-70% humidity without misting (pebble tray instead).

90% confidence · View full protocol →

Why does my alocasia have Spider mites?

Cause: Applying Imidacloprid-based systemic granules to treat pests, which inadvertently increases spider mite reproduction rates.

Solution: Stop using Imidacloprid (Bonide) if spider mites are the primary pest or are present alongside thrips.

Prevention: Properly identify the pest before applying systemic treatments; systemics are for insects, not arachnids (mites).

99% confidence · View full protocol →

Why does my alocasia have Root rot?

Cause: Alocasia corms (bulbous storage organs) can survive extreme root loss and regenerate through adventitious root formation, unlike fibrous-rooted plants. When root rot occurs, the corm stores sufficient carbohydrates and meristematic tissue to initiate new root primordia within 2-4 weeks under optimal conditions. This 'zombie' regeneration capability explains why Alocasias recover from 90% root loss that would kill other houseplants.

Solution: Remove all soil and gently rinse corm under lukewarm water to assess damage

Prevention: Maintain corm health by using chunky, well-draining aroid mix (40% bark, 30% perlite, 30% potting soil); water only when top 2 inches dry; ensure bright indirect light to support corm metabolism; inspect corms monthly by gently unpotting to check for firmness (healthy corms feel like firm potatoes).

92% confidence · View full protocol →

Why does my alocasia have Humidity requirements?

Cause: Alocasias are tropical understory plants native to humid Southeast Asian environments (60-95% RH typical). Indoor air, especially in winter with heating or in arid climates, often falls to 20-40% RH, causing: leaf tip browning, crispy edges, stunted new growth, increased spider mite susceptibility, and melting or distorted unfurling leaves. However, some varieties (like Baginda/Dragon Scale) are more tolerant of moderate humidity (45-60%) than commonly believed. The key is consistency - fluctuations between high and low humidity are more stressful than steady moderate levels.

Solution: Assess current humidity: Use a hygrometer ($10-15) placed near the plant to establish baseline

Prevention: Maintain consistent humidity year-round using automated humidifiers with built-in hygrometers. Group tropical plants together. Use pebble trays as backup. Monitor with hygrometer, not guesswork. Research specific variety needs - jewel Alocasias need higher humidity (70%+) than larger varieties like Odora.

90% confidence · View full protocol →

Common Questions

Frequently Asked About Alocasia

What problems can Alocasia get?

Our database contains 43 documented Alocasia cases covering 33 distinct topics, including diseases, pest identification, environmental stress, propagation, and advanced care protocols — each with verified solutions.

Structured Learning

Ready to Go Deeper?

Explore our Mastery Packs for structured, video-based learning with step-by-step protocols from 20,000+ analyzed plant cases.

Browse All Courses →